Our Pick: MayBee
Check PriceSpring Beekeeping: The Eight Jobs, In Priority Order
If you buy one thing before spring starts, buy a medium super you do not need yet: the MayBee 10-frame medium super box ($44.99) sitting empty in the garage is the single cheapest insurance policy in beekeeping, because the alternative is watching half your colony leave while a box ships. Spring is a race against a population curve, and the beekeeper who is one box ahead wins it. The beekeeper who is one box behind spends May chasing swarms into a neighbor's maple.
By The BeehiveKits Hive Desk2026-08-2918 min read Fact-checked against verified Amazon listingsHow we research
Here is the spring situation in one paragraph. A colony that survived winter is sitting on drawn comb with a queen who has been laying since late January, and the moment pollen comes in, that colony converts stores into bees at a rate that shocks first-year keepers. Population goes from a grapefruit-sized cluster to twenty or thirty thousand bees in six or eight weeks. Drones start appearing, which is the colony's own announcement that reproductive season has opened. Congestion follows population, and swarming follows congestion. Meanwhile the mite population that overwintered with them is riding the brood expansion upward too, quietly, and your window to do anything about it closes the day supers go on.
So spring has an order, and the order is not negotiable. First you find out what you have (inspection and deadout assessment). Then you fix the physical arrangement of the hive. Then you feed, because a cold April can starve a colony a week from the flow. Then you count mites, while you still can treat. Then you add space ahead of need. Then you manage swarming with splits, not scissors. Then you install whatever new bees you ordered. Then you find and mark the queens so the rest of the year is easier. Eight jobs, roughly in that sequence, most of them overlapping across six weeks.
This page is the spring chapter in a four-season set: it pairs with our summer guide, fall guide, and winter guide, and it sits alongside the month-by-month first-year beekeeping calendar, which covers the whole arc at lower magnification. Standard disclosure: no brand paid for placement, some links go to Amazon where purchases may earn us a small commission at no extra cost to you, and every price here was verified at publication.
What to know
- Spring is a race against the population curve: be one box ahead of the bees, always, and supering late is the most expensive mistake in the season.
- Count mites BEFORE supers go on. Once honey supers are on the hive, most treatments are off the table until you pull them in summer.
- Feed 1:1 syrup until natural forage is genuinely reliable, then stop; syrup in the supers is not honey and cannot be sold or labeled as such.
- Cutting swarm cells does not prevent swarming. Making a split does. The colony has already decided; your job is to give the decision somewhere useful to go.
- Reversing boxes is a tool, not a ritual: it helps a colony crowded into the top box and hurts one with a brood nest spread across both.
- Mark every queen you install or raise. Two minutes in April saves you fifteen minutes per inspection for the next two years.
At a glance
| Gear | The spring job it serves | When you need it in hand | Price | Check price |
|---|---|---|---|---|
| MayBee 10-Frame Medium Super Box | Add space ahead of need | Before the flow starts, not during | $44.99 | Check Price |
| Mann Lake Varroa EasyCheck | Mite count before supers go on | First warm inspection | $30.50 | Check Price |
| KAGZ 1.5-Gallon Hive Top Feeder | Feed until the flow is real | First warm inspection | $37.99 | Check Price |
| Mann Lake Pro Nuc 5-Frame Box | Splits and swarm prevention | Two weeks before drone brood is capped | $38.81 | Check Price |
| The Interceptor Pro Swarm Trap | Catch what leaves (yours or theirs) | Hung by early April in most regions | $175.00 | Check Price |
| benefitbee Queen Marking Kit | Mark the new queen | Install day and after every split | $21.99 | Check Price |
The spring gear stack, matched to the job that demands it

MayBee 10-Frame Langstroth Medium Super Box
MayBee · 10-frame Langstroth medium super · beeswax-dipped (listed) · roughly 50 lbs full vs 80 to 90 for a deep
Our verdict: The single highest-leverage spring purchase, because its value is entirely about timing. A medium super bought in March and stored empty costs $44.99; the same box needed on a Saturday in May and ordered that morning costs you a swarm, which is half your foraging force and most of your honey crop.
Spring supering fails on logistics, not knowledge. Everyone knows to add space before the colony fills; almost nobody has the box on hand when the colony fills two weeks earlier than expected. Owning a MayBee medium super box ($44.99) before the flow converts a shipping problem into a five-minute chore.
We default to mediums rather than deeps for supers because weight is the limiting factor for most backyard keepers: a full medium runs roughly 50 lbs, a full deep 80 to 90, and the difference determines whether you harvest alone or wait for help. Standardizing on medium supers also means every super frame in your operation is interchangeable, which simplifies everything from extraction to winter storage. The full argument is in deep vs medium supers.
Who should buy it
Anyone running wooden Langstroth equipment who expects a flow this year, which includes every second-year keeper and most strong first-year colonies from an early nuc.
What we don't like
It ships as a box, so you supply frames and foundation separately, and the total spring cost is higher than the box price suggests. Beeswax-coated boxes also weather faster than painted ones if you leave them fully exposed year-round.
- Type
- Medium super, 10-frame Langstroth
- Finish
- Dipped in beeswax (listed)
- Full weight
- About 50 lbs when full of honey (estimate)
- Frames included
- No, purchased separately
- Price
- $44.99
Pros
- Turns a swarm risk into a five-minute task
- Medium weight is manageable solo at harvest
- Standard 10-frame Langstroth fit
- Beeswax coating skips the paint-and-cure wait
Cons
- Frames and foundation are extra
- Coated pine needs a cover or it weathers

Mann Lake Varroa EasyCheck
Mann Lake · Purpose-built varroa monitoring vessel · alcohol wash or sugar roll · half-cup bee sample (about 300 bees)
Our verdict: Monitoring gear is the least exciting purchase in beekeeping and the one that changes the most outcomes. The EasyCheck makes the half-cup wash quick and consistent enough that you will actually do it monthly, which is the entire point, since a number you trend beats a number you take once in a panic.
The spring mite count has a deadline: it must happen before supers go on, because supers close the door on most treatments. A Mann Lake Varroa EasyCheck ($30.50) turns that count into a two-minute job at the hive, with a bowl-in-bowl design that separates mites from bees cleanly and a marked half-cup measure so your sample size is the same every time.
Consistency is the feature. Mite counts are only useful as a trend, and a trend requires the same method and the same sample size each visit. Improvised jar setups drift; a purpose-built vessel does not. Thresholds and what to do at each level are in Honey Bee Health Coalition guidance, with our treatment-by-chemistry breakdown in best varroa mite treatments.
Who should buy it
Every keeper with at least one colony. If you own exactly one piece of hive-health equipment, this is the one, because it tells you whether the rest of your year is a management problem or an emergency.
What we don't like
An alcohol wash kills the sampled bees, which bothers people and should be weighed honestly against the roughly 300 bees involved and the colony you are trying to save. Sugar rolls are gentler but less accurate.
- Method
- Alcohol wash or sugar roll
- Sample size
- Half cup, about 300 bees
- Construction
- Molded plastic bowl-in-bowl (listed)
- Use
- Monthly from spring through fall
- Price
- $30.50
Pros
- Consistent sample size makes counts comparable
- Fast enough that you will actually do it monthly
- Works for both wash and sugar-roll methods
- Sealed design travels between yards without spills
Cons
- Alcohol washes kill the sample of bees
- Still requires disciplined technique to be accurate

KAGZ 1.5-Gallon Hive Top Feeder
KAGZ · 10-frame Langstroth fit (listed) · 1.5-gallon capacity (listed) · refills without opening the brood nest
Our verdict: The feeder that matches spring's actual failure mode: a cold wet stretch during buildup, when a colony needs continuous carbohydrate and you need to deliver it without cracking the brood nest at 50F. Capacity is the whole argument, and 1.5 gallons means twice-weekly refills rather than daily ones.
Spring feeding is a volume game and a disturbance game at once, and a KAGZ 1.5-gallon hive top feeder ($37.99) wins both. It sits directly above the cluster, so bees reach it in weather that would strand them from an entrance feeder, and refilling means lifting one lid rather than opening the nest.
It also earns a second season in September, moving heavy 2:1 fall syrup in the same big gulps, which is why it appears again in our fall guide. The full field, including entrance feeders and multi-channel units, is compared in best bee feeders.
Who should buy it
Anyone installing a package or nuc this spring, and anyone whose colonies open light in March. On 10-frame equipment this is the default choice.
What we don't like
It adds a box-height to the stack, it must come off before supers go on, and a careless refill can drown bees if you ignore the access design.
- Capacity
- 1.5 gallons (listed)
- Fit
- 10-frame Langstroth (listed)
- Position
- Hive top, above the cluster
- Season used
- Spring 1:1 and fall 2:1
- Price
- $37.99
Pros
- Big reservoir means twice-weekly refills
- Bees reach it in cold weather
- No open syrup outside the hive to trigger robbing
- Doubles as the fall feeding workhorse
Cons
- Adds height to the stack
- Must be removed when supers go on

Mann Lake Pro Nuc 5-Frame Box
Mann Lake · 5-frame plastic nuc box · locking lid (listed) · stacks and stores flat between seasons
Our verdict: Swarm prevention that works requires a box to put the split in, and this is the least expensive way to have two or three of them waiting in March. Plastic means it shrugs off weather with no painting, no assembly, and no rot, and the locking lid makes it a legitimate transport box for swarm calls too.
Cutting queen cells does not stop swarming; splitting does, and splitting requires equipment you own before the cells appear. A Mann Lake Pro Nuc ($38.81) is the standard-issue answer: five frames, locking lid, no assembly, and cheap enough that owning three feels reasonable.
Beyond splits it earns its keep as a swarm-call box, a mating nuc for a queen you are raising, and a holding box for a colony you are moving. Our long-term notes on it are in the Pro Nuc review, and the split procedure itself is in how to split a hive.
Who should buy it
Every keeper going into their second spring with an overwintered colony, plus anyone who has told their county they will take swarm calls.
What we don't like
Plastic gets hot in direct sun, so it wants shade or a quick transfer in the South, and it is a temporary home rather than a permanent hive; plan to move the split into full equipment within a few weeks.
- Capacity
- 5 deep frames
- Material
- Molded plastic (listed)
- Lid
- Locking (listed)
- Assembly
- None required
- Price
- $38.81
Pros
- No assembly, no paint, no rot
- Locking lid makes it a real transport box
- Cheap enough to own several
- Doubles as a swarm-catch and mating nuc
Cons
- Heats up in full southern sun
- Short-term housing, not a permanent hive

The Interceptor Pro Complete Swarm Trap Kit
The Interceptor · Complete assembled swarm trap kit · designed to scout-bee volume preferences · mounts on a tree or post
Our verdict: The expensive end of swarm trapping, justified only if you will actually hang it and check it. Assembled and ready means it goes up in early spring instead of sitting as a project, and a single caught swarm pays for it several times over against the market price of a nuc.
Swarm trapping is the one part of beekeeping where the equipment can pay for itself in a single afternoon. The Interceptor Pro swarm trap ($175.00) arrives complete and assembled, which matters more than it sounds: traps that require a build session in March get hung in June, after swarm season.
Hang it 10 to 15 feet up, in dappled shade, facing south or southeast, at the edge of a treeline rather than in the middle of your apiary, and bait it with a lure. Cheaper DIY approaches, lure comparisons, and placement detail are in best swarm catching gear and how to catch a swarm. Bees caught this way are unknown genetics with unknown mite loads, so treat every catch as a colony that needs monitoring on day one.
Who should buy it
Keepers with rural or wooded property edges, anyone on a county swarm list, and anyone who wants to expand colony count without buying bees.
What we don't like
It costs more than the nuc you might otherwise buy, it only works if you hang it early and high, and caught swarms come with unknown genetics and unknown disease and mite status.
- Type
- Complete swarm trap kit
- Assembly
- Assembled (listed)
- Mounting
- Tree or post, 10 to 15 feet recommended
- Best hung
- Early spring, before drone flight peaks
- Price
- $175.00
Pros
- Arrives assembled, so it actually gets hung on time
- Catches your own swarms as well as feral ones
- One catch can offset the whole cost
- Durable enough to redeploy for years
Cons
- Premium price against DIY alternatives
- Caught colonies need immediate mite monitoring
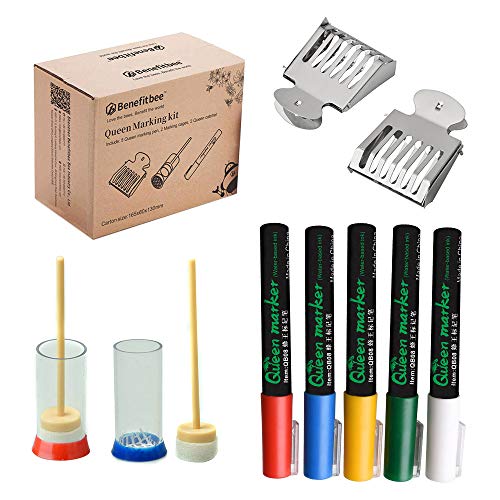
benefitbee Queen Bee Marking Kit
benefitbee · 5 queen marking pens · marking cage included (listed) · follows the international year-color code
Our verdict: A small purchase with an outsized effect on how your season feels. A marked queen turns the hardest part of an inspection into a glance, and a missing mark tells you instantly that the colony superseded or swarmed while you were not looking.
Finding an unmarked queen on a crowded May frame is genuinely difficult, and the time spent looking is time the colony spends open and cooling. A benefitbee queen marking kit ($21.99) includes the five year-code colors plus a plunger cage that presses her gently against the comb so you never handle her directly.
Mark on the thorax, keep the dot small, and let it dry before release. Practice on drones. And do not mark a queen the colony has only just accepted; wait until she is laying well. Requeening logic, including when to replace rather than mark, is in how to requeen a hive.
Who should buy it
Anyone installing a package or nuc, anyone making splits, and anyone who has ever spent twenty minutes hunting a queen on a hot afternoon.
What we don't like
Marking is a skill with a real failure mode: too much paint, or paint in the wrong place, can harm a queen or cause the colony to reject her. Practice on drones before you touch a queen that cost you money.
- Pens
- 5 colors (listed)
- Cage included
- Yes, plunger style (listed)
- Color code
- International year colors
- Best time
- After she is established and laying
- Price
- $21.99
Pros
- Cuts queen-finding to a glance
- Instantly reveals supersedure or a missed swarm
- Cage means no direct handling of the queen
- One kit covers years of year-colors
Cons
- Requires practice to do safely
- Marking a freshly accepted queen risks rejection
What the colony is actually doing in spring
Understand this and the checklist writes itself. A wintered colony is not a small version of a summer colony; it is a colony running an entirely different program. Through January and February the queen has been laying a small, tight patch of brood in the middle of the cluster, funded by stores. When the first real pollen arrives, usually maples, willows, alders, and whatever your region opens with, the program flips: nurse bees get the protein they need to produce brood food, the queen expands her laying to fill everything the cluster can keep warm, and the colony begins converting honey and pollen into bees as fast as thermal capacity allows.
The arithmetic is worth internalizing. A worker takes 21 days from egg to emergence, and a strong spring queen can lay 1,500 to 2,000 eggs a day. That means a colony's population three weeks from today was determined by what the queen did today, which is why spring problems announce themselves late and why an early-April queen failure shows up as a mid-May disaster. It also means colony growth in spring is exponential rather than linear, which is precisely the shape of curve humans are worst at anticipating.
Drones are the calendar you can read. Colonies rear drones only when they can afford them, and drones take 24 days plus roughly two weeks to reach sexual maturity. So when you see capped drone brood in bullet-shaped cells, the colony has publicly announced that it intends to participate in reproductive season, and reproduction for a honey bee colony means swarming. General swarm biology is well summarized in the Wikipedia entry on honey bee swarming, but the practical version is simpler: drones capped means the swarm clock has started, and you have roughly three to five weeks of runway.
Two other things are happening quietly. Mite populations are expanding along with brood, since Varroa destructor reproduces inside capped brood cells and spring is when capped brood becomes abundant. And the colony's stores are at their annual low right when its consumption is at its annual high, which is the mechanism behind the cruelest spring loss: a colony that starves in April, ten days from the flow, after surviving all of winter.
How to use this checklist
The eight jobs below are in priority order, meaning the order in which a delay hurts you most. They are not eight separate days; they overlap across roughly six weeks, and in a compressed northern spring several of them happen in the same afternoon. Work down the list at each visit and do what the colony's condition permits.
Two local dates anchor everything: your average last hard frost, and the start of your main nectar flow. Learn both from your club, not from the internet, and count backward from them. Supers go on two to three weeks before you think the flow starts. Mite counts happen before that. Splits happen when drone brood is capped and the colony is strong, which is usually before you feel ready.
Inspection cadence in spring is every 7 to 10 days on strong colonies, which is tighter than any other season. That is not fussiness; it is the interval at which you can still catch a swarm decision before it is irreversible, since queen cells go from egg to capped in about eight days. The technique itself, smoke light, move slow, work from the side, is in how to do a hive inspection, and this page assumes you already have it.
Job 1: The first warm-day inspection, and reading a deadout
The first real inspection happens on the first day above roughly 55 to 60F with sun and little wind, and it answers four questions in under fifteen minutes: is the colony alive, is it queenright, does it have stores, and does it have room. Look for eggs, which prove a laying queen within the last three days, a solid brood pattern with pearly larvae, and capped honey at the outside edges of the top box. Do not go frame by frame through the whole hive on a 55F day; you are looking for evidence, not conducting a census.
If the colony is dead, the deadout is the most valuable teaching document you will get all year, and it expires. Read it before robbing bees or wax moths erase the evidence. Four patterns cover most of what you will find:
| What you see | Most likely cause | What to change |
|---|---|---|
| Small cluster head-first in empty cells, honey elsewhere in the hive | Starvation, often isolation starvation in a cold snap | Heavier fall feeding, better winter configuration |
| Tiny fall-shrunken cluster, deformed wings, spotty brood, few dead bees on the floor | Varroa and the viruses it vectors | Earlier and verified late-summer treatment |
| Plenty of stores, wet mold on frames, water stains on the inner cover | Condensation | Moisture management next fall, not more insulation |
| Bees dead with tongues out, piles at the entrance, no other explanation | Possible pesticide exposure | Talk to your club and your neighbors |
The full diagnostic walkthrough is in how to diagnose a deadout. Then salvage: drawn comb from a deadout that did not die of disease is the most valuable thing in your barn, worth roughly a month of colony labor, and it goes straight into a package install or a split. Store it protected from wax moths until you use it.
Job 2: Reverse or unstack, but only if the colony asks for it
Colonies move up through winter, eating their way toward the top of the stack, so many wintered hives open in March with the entire brood nest and cluster in the upper box and an empty deep underneath. Reversing, putting the empty bottom box on top, gives the queen room to expand upward again, which is the direction she prefers, and evens out the stack.
The honest version, which many spring guides skip: reversing is a conditional tool, not an annual ritual. Reverse when the brood nest is genuinely concentrated in one box and the other is empty. Do not reverse when the brood nest spans both boxes, because you will split the nest across a cold gap and force the bees to either abandon brood or spend themselves keeping two patches warm. And do not reverse on a cold week just because the calendar says March. Extension programs are consistent that the objective is relieving congestion and restoring upward room, not the mechanical act itself. When in doubt, look at where the brood is and act on that.
Unstacking is the other half of this job. Pull the mouse guards once the rodents lose interest, take the winter wrap off when you stop needing it (a wrapped hive in a warm April can cook), swap in a clean bottom board if you run solid boards, and scrape the propolis so your boxes separate without a crowbar in June. If you run a screened bottom board, this is when the winter insert comes out; the tradeoffs live in screened vs solid bottom boards.
Job 3: Feed until the natural flow is genuinely on
Spring feeding is misunderstood in both directions. Some keepers never feed and lose colonies in April; others feed until July and contaminate their honey crop. The rule that resolves it: feed 1:1 sugar syrup whenever the colony's stores are light or the weather is preventing foraging, and stop the moment the natural flow is reliably on.
Light means the hive lifts too easily at the back, or you see less than two or three frames of capped stores. Weather-preventing means a week of cold rain in the middle of buildup, which happens most springs and is exactly what kills colonies that were fine in February. A hive top feeder solves both cases, because you can refill a KAGZ 1.5-gallon hive top feeder ($37.99) in thirty seconds without opening the brood nest on a 50F morning, and 1.5 gallons means you are refilling twice a week, not daily. Entrance feeders work but hold less and advertise a food source at the front door, which is a robbing invitation once the dearth arrives. The full comparison is in hive top feeder vs entrance feeder.
Syrup ratio in spring is 1:1 by weight, sugar to water, which mimics nectar and stimulates comb building and brood rearing. Save 2:1 for fall, when the goal is storage rather than stimulation; the mixing details are in how to feed bees sugar syrup. Pollen substitute is a separate decision and mostly relevant where natural pollen is genuinely scarce or where you are pushing a colony toward an early almond-style demand, and our take is in pollen patties and substitutes.
The hard stop: when honey supers go on, syrup comes off. Sugar syrup stored in supers is not honey and cannot honestly be sold or given away as honey. If you need to feed a colony that already has supers, pull the supers first or accept that you have made feed, not a crop.
Job 4: Count mites before the supers go on
This job is fourth in order but first in consequence, because it has a hard deadline that most beginners discover after they miss it. Once honey supers are on the hive, nearly every varroa treatment is unavailable to you, either because the label prohibits use with supers on or because you would be contaminating a food crop. The window for spring mite work closes the day you add the first super, and it does not reopen until you pull the crop in mid to late summer. That is potentially a four-month blind spot in the middle of the mite's fastest growth season.
So the sequence is: count first, decide, act if needed, then super. Counting means an alcohol wash or sugar roll of about half a cup of bees taken from a brood frame, which is roughly 300 bees, and a purpose-built shaker jar such as the Mann Lake Varroa EasyCheck ($30.50) makes the count repeatable enough to trend across the season. Sticky boards under a screened bottom tell you something, but they are not a substitute for a wash; the comparison of methods is in best mite monitoring tools.
Thresholds: extension guidance and the Honey Bee Health Coalition varroa management resources put the spring action threshold low, around 2 to 3 mites per 100 bees, and lower still if you intend to run supers on that colony for the next several months. A colony at 3 percent in April is a colony at a much worse number in July with no legal way to fix it.
If you treat in spring, chemistry choice is constrained by temperature and by brood presence. Oxalic acid works well only when the colony is broodless or nearly so, which spring colonies are not, so its spring role is narrow (it is genuinely useful on a newly hived swarm or package before brood is capped). Formic acid penetrates cappings and has a label temperature window. Amitraz strips need weeks of contact time. The full chemistry comparison is in best varroa mite treatments, and the timing logic is in when to treat for varroa. Whatever you choose, read the label and follow it, including the super restrictions.
Job 5: Add supers ahead of need, not in response to need
Here is the rule we would tattoo on a hive tool: add the next box when the current one is about 70 to 80 percent drawn and occupied, not when it is full. Bees need space in advance because they need somewhere to put nectar the same afternoon they collect it, and because congestion is the primary trigger for swarm preparation. A colony that runs out of room in a strong flow does not wait politely; it makes queen cells.
The practical version: have at least one more box on hand than you currently need per hive, which is why we open this guide by telling you to buy a MayBee 10-frame medium super box ($44.99) you do not need yet. Mediums are our default super for backyard keepers because a full medium runs roughly 50 lbs where a full deep runs 80 to 90 lbs, and the difference is the difference between lifting a box and needing help; the case for each is in deep vs medium supers.
Two mechanical notes. If the frames in your new super are bare foundation, bees are often reluctant to move up into it during a cool spell; baiting with one drawn frame from below, moved up into the middle of the new box, solves this reliably. And decide about a queen excluder before the flow, not during it: an excluder keeps brood out of your honey but adds a barrier bees are sometimes slow to cross, and the standard fix is to get them drawing above it first, then add the excluder. Frame and foundation choices are covered in frames and foundation.
Job 6: Swarm prevention, and why cutting cells is not it
Swarming is not a malfunction. It is reproduction at the colony level, and a strong, well-managed, healthy colony in spring is exactly the colony most likely to do it. Your goal is not to prevent the biological impulse; it is to make sure the resulting new colony ends up in your equipment rather than in a sycamore forty feet up.
The mistake almost every second-year beekeeper makes: finding queen cells, cutting them out, closing the hive, and believing the problem is solved. It is not. By the time cells are present the colony has already committed, the old queen is being slimmed down for flight, and the bees will simply build more cells, often in places you will miss. Cutting cells buys you about a week and costs you the ability to see how far along they are. Worse, if you cut every cell and they swarm anyway from one you missed, you can end up queenless with no cells at all.
What actually works, in ascending order of effort:
- Space, early. The cheapest prevention. See job 5.
- Open the brood nest. Inserting a frame of foundation or drawn comb into the middle of a congested nest gives nurse bees somewhere to go and reduces the congestion signal.
- Make a split. The one that reliably works. Remove the queen with a few frames of brood, bees, and stores into a nuc box and let the parent colony raise a new queen from the cells they already made. You now have two colonies and neither swarmed. A Mann Lake Pro Nuc 5-frame box ($38.81) is the cheap, stackable, weatherproof way to have two or three of these waiting; the full procedure is in how to split a hive.
Timing matters: splits work best when drone brood is capped and drones are flying, because a virgin queen needs mature drones to mate with. Too early and you get a poorly mated queen; too late and they have already gone. The broader prevention strategy, including checkerboarding and the Demaree method, is in how to prevent swarming.
And hedge your bets. A baited swarm trap hung 10 to 15 feet up at the edge of your property in early spring catches your own swarms and, in many yards, catches somebody else's for free. A complete assembled unit like The Interceptor Pro swarm trap ($175.00) is the premium end of this; cheaper approaches and lure strategy are in swarm catching gear and how to catch a swarm.
Job 7: Install packages and nucs
New bees arrive in spring, and the two formats want different handling. A package is roughly three pounds of loose bees with a caged queen they have not met; a nuc is a small functioning colony on drawn comb with a laying queen and brood at all stages. A nuc costs more and is worth it for most first-year keepers, mainly because it arrives already working; the honest comparison is in package bees vs nuc.
Package install, compressed: spray the bees lightly with 1:1 syrup, remove the queen cage and check that the queen is alive, hang the cage candy-end-up between two center frames, shake or pour the bees in, replace frames gently, reduce the entrance, put a full feeder on, and close up. Then leave them alone for five to seven days, at which point you confirm the queen has been released and is laying. The step-by-step is in how to install a package of bees.
Nuc install, compressed: transfer the frames into the center of your deep in the same order and orientation they came out of the nuc box, fill the outside positions with your own frames, reduce the entrance, feed, and check for eggs in a week. Detail in how to install a nuc.
Feed new installs relentlessly. A package on bare foundation is building an entire house from nothing while also raising brood, and comb costs the colony a great deal of honey to produce. This is the single situation where over-feeding is nearly impossible in spring. It is also the one moment an oxalic acid treatment fits neatly, because a package is broodless for its first several days and the mites that rode in on the bees are fully exposed.
Job 8: Find and mark the new queen
Last on the list because it is the least urgent, and worth doing because it pays for itself every inspection for the next two years. A marked queen is faster to find, and finding her fast is the difference between a fifteen-minute inspection and a forty-minute one that leaves the colony rattled. The mark also tells you unambiguously whether the queen in the hive is the one you put there, which is the fastest way to detect a supersedure or a swarm you did not notice.
A benefitbee queen marking kit ($21.99) includes the marking pens and a plunger-style cage that holds her still against the comb without you touching her. The international color code is worth following even if you keep two hives: white for years ending in 1 and 6, yellow for 2 and 7, red for 3 and 8, green for 4 and 9, blue for 5 and 0. Mark small, on the thorax, and let it dry a few seconds before releasing her.
Two practical notes. Practice on drones first; they cannot sting you and nobody misses one. And do not mark a queen the colony has just accepted, since handling a newly introduced queen is a good way to get her balled. Wait until she is laying well and the colony has settled. Requeening decisions, including when a spring queen should simply be replaced, are covered in how to requeen a hive.
The spring shopping list, in the order you will reach for it
Everything below serves a specific job on this page. We have deliberately left out the seasonal gear that gets sold to spring beginners and used in September, if ever.
| Buy | Because | Price |
|---|---|---|
| Mann Lake Varroa EasyCheck | The count that has to happen before supers | $30.50 |
| KAGZ hive top feeder | Carries new installs and cold-snap colonies | $37.99 |
| MayBee medium super box | The box you own before you need it | $44.99 |
| Mann Lake Pro Nuc box | Splits, swarm catches, queen banking | $38.81 |
| benefitbee queen marking kit | Two minutes now, two years of faster inspections | $21.99 |
| The Interceptor Pro swarm trap | Free bees, and insurance against your own swarms | $175.00 |
What we would not buy in spring: a honey extractor (rent or borrow for your first harvest, and see the extractor guide before spending), a second full hive kit before you know whether you are splitting, or pollen substitute in a region with genuine early pollen. The whole-season budget picture is in the beekeeping cost index.
Spring mistakes that cost people the season
Supering too late. The most common and most expensive. A colony that fills its space during a flow either swarms or stops storing, and both outcomes cost you honey. The fix costs $44.99 and lives in your garage. If you are unsure whether to add a box, add the box; an unnecessary empty super costs you nothing but a little ventilation management.
Treating with supers on. Every spring somebody realizes in June that their mite count is terrible, reaches for a treatment, and either violates the label or contaminates their crop. This is why the mite count belongs before the super, not after. If you find yourself in June with high mites and full supers, the answer is usually to pull and extract the crop early, then treat, which is a real cost and entirely avoidable in April.
Cutting queen cells and believing you solved swarming. Covered above. The colony has decided. Give the decision a nuc box to move into.
Inspecting too cold or too often on weak colonies. Opening a hive below roughly 55F chills brood and costs the colony heat it is budgeting carefully. A weak spring colony does not need weekly disturbance; it needs food, warmth, and time. Strong colonies get the 7-to-10-day cadence; weak ones get left largely alone while you fix the underlying reason they are weak.
Feeding into the honey crop. Stop syrup when supers go on. Full stop.
Equalizing without thinking. Moving brood from a strong hive to a weak one is a legitimate technique, but if the weak colony is weak because of disease or a failing queen, you have just moved good brood into a bad situation and possibly moved pathogens the other way. Diagnose first.
Assuming a booming March colony is healthy. Population is not health. A colony can build explosively in April on the strength of a huge mite load it will not survive in September, which is exactly the trap that makes the fall guide the most important page in this set.
Regional adjustments: South, Midwest, North
Spring is the season with the widest regional spread in North American beekeeping, easily eight weeks between the Gulf Coast and the northern tier. The jobs are the same; the calendar and the emphasis change.
| South (zones 8 to 9) | Midwest / mid-Atlantic (zones 5 to 7) | North and high elevation (zones 3 to 4) | |
|---|---|---|---|
| First inspection | Mid-February | Mid-March to early April | Early to mid-April |
| Packages / nucs installed | March | Mid-April to mid-May | May, sometimes late May |
| Main flow starts | Late March to April | Mid to late May | June |
| Peak swarm window | March to April | Late April to early June | Late May to June |
| Spring feeding | Often brief; watch for early flows | Standard: feed through cold snaps | Heavy and extended; compressed buildup |
South. Your swarm season arrives before you feel ready for it, and it is the defining spring event. Get supers on absurdly early by northern standards, have nuc boxes built in February, and understand that brood is close to year-round, which means varroa never gets a broodless holiday and your mite management has to be relentless. Spring here also runs straight into a summer dearth that behaves like a second winter, so your spring is shorter than the map suggests. Heat management starts earlier than you think; see beekeeping in hot climates.
Midwest and mid-Atlantic. The baseline this page is written to. The characteristic risk is a warm March that pulls colonies into heavy brood rearing followed by a cold, wet April that starves them, so keep syrup available even when the maples looked promising. Your flow and your swarm season overlap, which is the whole reason job 5 outranks job 6.
North. Everything compresses. Buildup, flow, and swarm season stack into about ten weeks, which means less margin for a missed inspection and a much stronger argument for overwintered local nucs over packages, since a package installed in late May has very little season left to build on. Do not remove insulation or wraps too early; a warm week in April is not spring in Minnesota. Regional cold-climate strategy is in beekeeping in cold climates.
What spring is preparing you for
Every spring decision has a summer consequence, and it helps to make them with that in view.
The supers you add now determine your crop and your harvest logistics in July and August, which is when you will want to have already read how to harvest honey and decided whether you are borrowing an extractor. The splits you make now are the colonies that need their own mite management and their own winter stores, which doubles your fall workload; plan for that before you make four splits in one April. The mite count you take now is your baseline, and the value of a baseline is that it makes your July number interpretable.
Most importantly, the queens you install or let the bees raise this spring are the queens who will produce the winter bees in August and September. A colony with a mediocre spring queen is a colony with a thin fall population, and thin fall populations do not overwinter. If a spring queen is laying a poor pattern in May, that is a spring problem with a spring solution, and postponing it to August is how people lose colonies in January.
Next up in this set: the summer beekeeping guide, which covers the flow, the harvest, and the dearth that follows it. Then the fall beekeeping guide, which is the most consequential page of the four. Then the winter beekeeping guide, which is mostly about restraint. And if you want the whole year at lower magnification, the first-year beekeeping calendar lays it out month by month.
More gear worth comparing
Beyond this guide: the highest-rated gear across every category and budget, with a live price check on each.




As an Amazon Associate we may earn from qualifying purchases, at no cost to you.
Quick shop: every pick
Skip the scroll: the whole lineup, with a live price check on each.
- MayBee 10-Frame Langstroth Medium Super BoxAdding Space Ahead of NeedMayBee · $44.99Check Price
- Mann Lake Varroa EasyCheckThe Pre-Super Mite CountMann Lake · $30.50Check Price
- KAGZ 1.5-Gallon Hive Top FeederSpring Feeding and New InstallsKAGZ · $37.99Check Price
- Mann Lake Pro Nuc 5-Frame BoxSplits and Swarm ControlMann Lake · $38.81Check Price
- The Interceptor Pro Complete Swarm Trap KitCatching Swarms (Yours and Everyone Else's)The Interceptor · $175.00Check Price
- benefitbee Queen Bee Marking KitMarking the New Queenbenefitbee · $21.99Check Price
How we chose
We built this checklist around what the colony is doing biologically each week, not around calendar dates, because spring arrives six weeks apart across the regions we write for.
Job order reflects consequence, not effort: the tasks that become impossible or ruinous if delayed sit at the top.
Gear picks are limited to items that a specific spring job genuinely requires. We left out anything that is a nice-to-have in April.
Varroa thresholds, treatment timing, and biology claims are grounded in extension and Honey Bee Health Coalition guidance, linked inline.
Prices come from our verified offer table and were checked at publication. Specs we cannot independently confirm are written as listed.
No brand paid for inclusion, and we recommend against buying several categories of spring gear that beginners are routinely sold.
Key terms
- Buildup
- The spring expansion phase, when a colony converts stores and incoming pollen into brood at an exponential rate. Buildup determines your foraging population at the flow, which determines your crop, which is why spring feeding and space management pay off months later.
- Reversing
- Swapping the position of brood boxes so the colony, which has eaten its way to the top over winter, has empty comb above it again. A conditional tool: correct when the brood nest sits entirely in one box, harmful when the nest spans both and reversing would split it.
- Swarm cell
- A queen cell built along the bottom edges or faces of frames when a colony is preparing to reproduce. Distinguished from supersedure cells, which usually appear on the face of the comb and mean the colony is replacing a failing queen rather than dividing.
- Split
- Dividing one colony into two, typically by moving the queen with frames of brood, bees, and stores into a nuc box while the parent raises a new queen from existing cells. The reliable answer to swarm pressure, and the cheapest way to increase colony count.
- Supering
- Adding honey supers above the brood nest, ideally when the current box is 70 to 80 percent drawn and occupied rather than full. Supering ahead of need prevents the congestion that triggers swarming and gives foragers somewhere to put nectar the day they collect it.
- Alcohol wash
- The standard varroa monitoring method: about half a cup of bees, roughly 300, taken from a brood frame and washed to dislodge mites for counting. Kills the sample but gives the most accurate number, and accuracy is what makes a treat-or-not decision defensible.
- Drone brood
- Capped brood in raised, bullet-shaped cells. Its appearance in spring signals that the colony has entered reproductive mode and that swarm preparation has a clock running. Also the mite's preferred nursery, since drone brood stays capped longer.
- Queen marking
- A small dot of paint on the queen's thorax, colored by the international year code (white, yellow, red, green, blue for years ending 1-6, 2-7, 3-8, 4-9, 5-0). Speeds inspections and reveals unnoticed supersedure or swarming at a glance.
Questions, answered
when should i do my first spring hive inspection
On the first calm, sunny day above roughly 55 to 60F, which is mid-February in the Gulf South, mid-March to early April across the Midwest and mid-Atlantic, and April in the northern tier. Keep it short: you are checking for eggs, brood pattern, stores, and space, not conducting a full frame-by-frame census. Opening a hive in cold weather chills brood and costs the colony heat it is carefully budgeting.
how do i stop my bees from swarming in spring
Give them space before they need it and make a split when they show swarm cells. Adding the next box at 70 to 80 percent drawn addresses the congestion trigger, and opening the brood nest with an inserted frame helps too. Once queen cells are present the colony has committed, and the only reliable response is dividing it, usually by moving the old queen into a nuc box and letting the parent raise a new queen.
does cutting queen cells prevent swarming
No. By the time cells exist the decision is made, and the bees will simply build more, often somewhere you will miss. Cutting cells buys about a week, destroys the information you had about their timeline, and risks leaving you queenless if they swarm from a cell you overlooked. Split instead.
when should i put honey supers on
Two to three weeks before your local main flow starts, and after your mite count. Add the next super when the box below is roughly 70 to 80 percent drawn and occupied rather than full. If the super holds bare foundation and the bees are slow to move up, move one drawn frame from below into the middle of the new box to bait them.
can i treat for varroa with honey supers on
Almost never. Most varroa treatment labels prohibit use with honey supers in place, and treating anyway risks contaminating a food crop. This is exactly why the spring mite count belongs before the first super goes on. If you discover a high count mid-season with supers on, the usual answer is to pull and extract the crop early, then treat.
how long should i feed bees in the spring
Feed 1:1 syrup while stores are light or weather is preventing foraging, and stop when the natural flow is reliably on. New packages and nucs on bare foundation should be fed continuously until the brood boxes are largely drawn, typically four to eight weeks. Syrup must come off before honey supers go on, because syrup stored in supers is not honey.
should i reverse my brood boxes in spring
Only if the brood nest is concentrated in the upper box with an empty box below. That is the situation reversing is designed for, and it restores upward room for the queen. If brood spans both boxes, reversing splits the nest across a cold gap and does more harm than good. Look at where the brood actually is rather than following the calendar.
what do i do with a hive that died over winter
Read it before you clean it. A small cluster head-first in empty cells means starvation; a tiny shrunken cluster with deformed wings points to varroa; mold and water staining point to condensation. Then salvage the drawn comb, which is the most valuable asset a deadout leaves behind, unless disease is suspected, and reuse it for a package install or a split.
when should i split my hive in the spring
When the colony is strong, drone brood is capped, and drones are flying, since a virgin queen needs mature drones to mate with. In practice that means April to May across most of the Midwest, March in the South, and late May into June in the North. Splitting too early produces poorly mated queens; splitting after cells are capped means racing a swarm.
should i mark my queen and what color
Yes, if you are comfortable handling her with a marking cage, because a marked queen makes every future inspection faster and instantly reveals an unnoticed supersedure or swarm. Use the international year code: white for years ending in 1 or 6, yellow for 2 or 7, red for 3 or 8, green for 4 or 9, blue for 5 or 0. Practice on drones first.
Filed under Explainer
Keep reading
Summer Beekeeping Guide
What follows spring: the flow, the harvest, the dearth, robbing pressure, and keeping bees cool and watered.
Fall Beekeeping Guide
The most consequential season of the four: winter bees, mite timing, and feeding to weight.
Winter Beekeeping Guide
Hands off, heft monthly, control condensation, and use the broodless window. Plus the December ordering season.
Your First-Year Beekeeping Calendar
The whole year at lower magnification, month by month, from December ordering to your first anniversary inspection.
How to Split a Hive
The procedure behind job 6, step by step, including walk-away splits and queen-right divisions.
When to Treat for Varroa
The timing logic behind the pre-super count, and how spring numbers set up your late-summer decision.