Our Pick: Keenso
Check PriceHow to Move a Beehive Without Losing the Bees
Moving a beehive is two problems in one. The mechanical problem is keeping a stack of loose boxes holding sixty thousand insects together in a moving vehicle, and it is solved for about fourteen dollars with a ratcheting hive strap like the Keenso 16.4-foot strap ($13.66). The behavioral problem is that field bees navigate home to a remembered location rather than to their colony, so a hive moved a hundred feet across your own yard loses most of its foragers to an empty patch of grass.
By The BeehiveKits Hive Desk2026-08-2919 min read Fact-checked against verified Amazon listingsHow we research
That behavioral problem is where the old rule comes from: move a hive less than three feet, or more than three miles. Inside three feet, returning foragers find the entrance anyway. Beyond three miles, you are outside the colony's normal foraging range, so every bee reorients on its first flight and the move is clean. In between, and the distance from your back fence to your side yard is squarely in between, bees fly home to where home used to be, cluster on the grass, and die there.
The rest is logistics with real consequences. Move at night or before dawn when the whole population is home. Seal the entrance but never seal the ventilation, because a closed hive in a warm vehicle can cook a colony in under an hour, and heat kills far more transported bees than bumps in the road do. Strap the stack so the boxes cannot shift. Have the new stand built and level before you pick anything up, because a hive on your tailgate is not the moment to discover the ground slopes.
This page is the procedure. Where to put the hive once it gets there is the placement guide, moving frames rather than whole colonies is how to split a hive, and the merge that sometimes follows a move is how to combine two hives. Standard disclosure, plainly: no brand paid to appear here, and some links go to Amazon, where a purchase may earn us a small commission at no extra cost to you. Prices were verified at publication and drift; check the live listing.
What to know
- Move less than 3 feet or more than 3 miles. In between, foragers return to the old location and are lost, because bees navigate to a remembered entrance position, not to their family.
- Move at night or before first light, when every forager is home. A daytime move strands the entire field force.
- Strap the whole stack, bottom board through outer cover, with a ratcheting strap. Boxes that shift in transit crush bees and can open the hive on the road.
- Seal the entrance, never the ventilation. Heat in a closed vehicle is the number one killer of transported colonies, well ahead of rough roads.
- Build and level the new stand before you touch the hive. Setting a strapped hive down on uneven ground is how backs and boxes get broken.
- For an in-yard move, use the branch trick, the 3-feet-a-day shuffle, or the 3-weeks-away round trip. All three work; pick by how much time you have.
- On arrival, open the entrance and walk away. Reorientation flights happen on the first warm morning, and the colony does not need you there for it.

Keenso Beehive Ratchet Strap, 16.4 ft
Keenso · 16.4 ft ratcheting tie-down strap for beehives (listed)
Our verdict: The cheapest insurance in beekeeping. A ratcheting strap run over the outer cover and under the bottom board holds the whole hive together through a carry, a truck bed, and a windstorm, and it costs less than a bag of sugar.
Every hive move starts here. The Keenso 16.4-foot beehive strap ($13.66) is long enough to wrap a three or four-box stack and uses a ratchet rather than a cam buckle, which matters because cam buckles creep under vibration and ratchets do not.
Run it front to back over the top so it pins the covers down and captures the bottom board, then snug it until nothing rocks. Buy one per hive, because a strapped hive also survives wind, curious dogs, and the moment a stand settles unevenly. Bear country needs an electric fence rather than a strap; see the apiary predators guide.
Who should buy it
Every beekeeper. If you own a hive you should own a strap, whether or not you plan to move anything this year.
What we don't like
Nylon webbing degrades in years of UV exposure, and a ratchet left permanently on a hive can rust. Check the webbing before you trust it with 150 pounds.
- Length
- 16.4 ft (listed)
- Type
- Ratcheting tie-down
- Use
- Transport, wind, and stack security
- Price
- $13.66
Pros
- Long enough for a tall stack
- Ratchet holds tension where cam buckles creep
- Cheap enough to keep one per hive
Cons
- Webbing degrades with long UV exposure
- Ratchet hardware can rust if left out year-round

Gsycle Beehive Fasteners with Nuts, 10 Sets
Gsycle · 10 sets adjustable beehive buckle fasteners with nuts (listed)
Our verdict: For anyone who moves hives more than once a year, mounted fasteners beat re-strapping every time: the hardware lives on the boxes, the hive clips shut in seconds, and lids stop lifting in wind between moves.
Straps are for occasional moves. If you move colonies to pollination sites, shuffle yards, or simply live somewhere windy, Gsycle beehive fasteners, 10 sets ($26.39) are the better answer: mounted to the boxes, adjustable to the stack height, and clipped shut in seconds without laying out fourteen feet of webbing in the dark.
Ten sets covers several hives. The tradeoff is installation time and hardware permanently on your woodenware, which some keepers dislike on aesthetic grounds and which is entirely invisible once bees are flying.
Who should buy it
Keepers who move hives regularly, anyone in a windy or exposed site, and sideliners running enough colonies that re-strapping each one is a real time cost.
What we don't like
Installation takes an afternoon, the hardware is stack-height specific once adjusted, and adding or removing a box means readjusting.
- Quantity
- 10 sets (listed)
- Type
- Adjustable buckle fasteners with nuts
- Use
- Permanent hive-box fastening
- Price
- $26.39
Pros
- Hive is transport-ready in seconds
- Keeps lids down in wind year-round
- Ten sets covers a small apiary
Cons
- Requires installation on every box
- Needs readjusting when the stack height changes
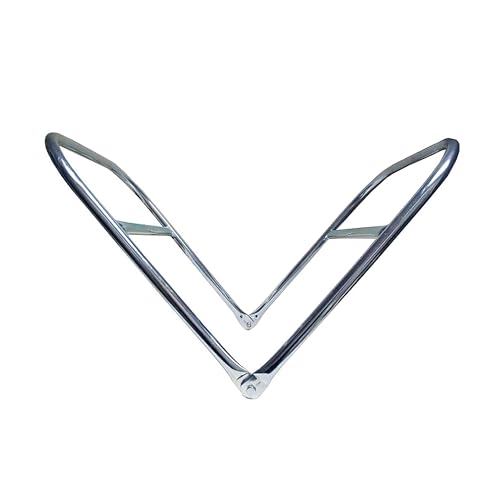
Mann Lake Heavy Duty Hive Carrier
Mann Lake · Heavy duty two-person beehive lifting device (listed)
Our verdict: A full deep runs 80 to 90 pounds and a stacked hive is far worse, carried in an awkward crouch by two people with nothing to hold. A hive carrier clamps the strapped stack and gives both carriers proper handles, which is the difference between a lift and an injury.
The most expensive part of moving a hive is usually your back. The Mann Lake heavy duty hive carrier ($92.95) is a two-person device that grips a strapped hive and provides handles at a workable height, turning a bear hug of a live, heavy, awkward object into a controlled carry between two people.
It is not a solo tool and it does not replace the strap, it works with it. For keepers who move colonies with any regularity, or anyone with an existing back problem, it is the best ninety dollars in this article. If you only move a hive once every few years, breaking the stack into single boxes is free.
Who should buy it
Anyone moving full hives more than occasionally, keepers with back or shoulder limitations, and anyone whose apiary is far enough from the vehicle that box-by-box trips are impractical.
What we don't like
It costs more than the strap, the fasteners, and the reducers combined, requires a second person, and does nothing for a solo beekeeper.
- Type
- Two-person hive lifting device
- Construction
- Heavy duty (listed)
- Use
- Carrying strapped full hives
- Price
- $92.95
Pros
- Real handles at a sane carrying height
- Keeps the load stable between two people
- Makes summer hive moves genuinely manageable
Cons
- Requires two people
- Expensive relative to the rest of the moving kit
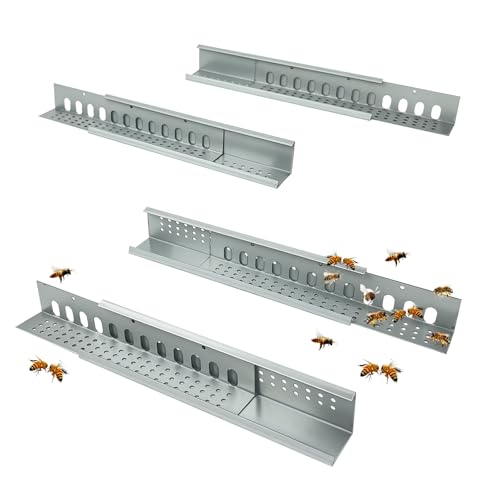
GJD Beehive Entrance Reducer and Mouse Guard, 4-Pack
GJD · 4-pack stainless sliding entrance reducer and mouse guard (listed)
Our verdict: A colony that just moved is disoriented and short on foragers, which is exactly the profile robbers look for. A sliding metal reducer narrows the door to something defensible and then earns its keep again in November as a mouse guard.
Every move should end with a reduced entrance for a few days. The GJD entrance reducer and sliding mouse guard 4-pack ($18.99) is our default because metal does not get chewed, the slider adjusts without pulling the whole piece out, and four of them covers a small apiary.
Same hardware, two jobs: a defensible door for a weak or newly moved colony, and the mouse barrier that goes on in fall and stays until spring. Robbing defenses beyond a reducer, including screens, are in robbing screens and entrance reducers.
Who should buy it
Everyone. Reducers are needed for new colonies, splits, moves, dearths, and winter, which covers most of the year for most hives.
What we don't like
Sizing varies with hive brand and some entrances need trimming or shimming, and metal reducers can be fiddly to slide once propolized in place.
- Quantity
- 4-pack
- Material
- Stainless steel (listed)
- Function
- Entrance reducer and sliding mouse guard
- Price
- $18.99
Pros
- Metal will not be chewed through by mice
- Adjustable opening without removing the piece
- Four hives covered for under twenty dollars
Cons
- Fit varies across hive brands
- Sliders stick once propolized
Why three feet or three miles
A forager leaving the hive for the first time performs orientation flights: widening arcs facing the entrance, memorizing the hive's appearance and, more importantly, its position relative to landmarks and the sun. After that she navigates back to that position with real precision. She is not homing on her sisters or on hive scent from a distance; she is flying to a place.
Move that place while she is out, and she returns to empty air, hunts the immediate area, and eventually clusters on the ground or drifts into a neighboring hive. Do it in the middle of a working day and you can strand the majority of a colony's field force, which is also the majority of its foraging capacity and a large share of its population.
Under three feet, the displacement is small enough that a returning bee searching around the remembered spot finds the entrance. Over three miles, you are outside the colony's normal working radius, typically a couple of miles from the hive for most foraging (Wikipedia: western honey bee), so no bee has a memorized route that overlaps the new location. Confined for a night and released into unfamiliar terrain, the whole colony reorients from scratch.
The three kinds of move
| Move | Distance | Difficulty | Approach |
|---|---|---|---|
| Nudge | Under 3 feet | Trivial | Just move it, ideally at dusk. No preparation needed |
| In-yard or across the property | 3 feet to 3 miles | Hardest of the three | Branch trick, 3-feet-a-day shuffle, or a 3-week round trip |
| Relocation | Over 3 miles | Physically hard, behaviorally easy | Strap, seal, ventilate, move at night, open on arrival |
The counterintuitive part is that the short move is the difficult one. Hauling a colony forty miles to a new apiary is heavy work but behaviorally simple: the bees have no choice but to reorient. Sliding the same hive across the yard to a sunnier spot is light work and behaviorally fraught, because half the colony has that old location memorized and will keep going back to it for days.
The practical consequence: if you are relocating within the same property and can spare the time, the cleanest method is often to take the hive away entirely, park it at a friend's yard three or more miles off for two to three weeks, and then bring it back to the new spot. Everything reorients twice and nothing is lost. It is more driving and less thinking, and thinking is what goes wrong.
Short-move workarounds that actually work
The branch trick. Move the hive to its new spot at night, then lean a leafy branch, a board, or a bundle of brush across the entrance so departing bees have to crawl out through an obstruction. The disruption prompts many of them to reorient before flying off. Effective, free, and imperfect: expect to lose some foragers anyway, and expect a cluster of confused bees at the old site for a day or two. Set an empty box at the old spot in the evening, then carry those stragglers over after dark.
Three feet a day. Slide the hive up to three feet each evening until it arrives. It is the most reliable method for an in-yard move and the slowest, because forty feet is a two-week project. Best for moves of ten or fifteen feet, and genuinely tedious past that. Some keepers push to five or six feet a day with the branch trick layered on top.
Three weeks away. Haul the hive more than three miles, leave it for two to three weeks so every forager's memory of the old spot expires with the bees who held it, then bring it back to the new location. This is the only method that is essentially foolproof for a mid-range move, and it costs two round trips.
Close it up for 48 to 72 hours. Confine the colony with screen in a cool, shaded, well-ventilated position at the new spot so bees lose their fix on the old entrance. It works, and it stresses the colony, needs real ventilation, and is only appropriate in cool weather with a strong healthy hive. We use it least.
Whatever you choose, reduce the entrance for a few days after the move. A colony that just lost a chunk of its field force is temporarily weaker than its neighbors and more likely to get robbed. A set of metal GJD entrance reducers and sliding mouse guards ($18.99) covers four hives for the price of lunch and stays on through winter as a mouse guard.
Timing: night, dawn, and cool weather
Move when all the bees are home. That means after full dark or before first light, and it is the single most important timing decision in the whole job. A hive moved at 2 pm leaves thousands of foragers in the field with nowhere to come back to; the same hive moved at 10 pm moves complete.
Cool weather is the second variable. A colony sealed in a box generates a lot of heat, and the cooler the ambient air, the more margin you have. Early spring and late fall are the comfortable seasons for moving hives. Midsummer moves are doable and demand more ventilation, a shorter transit, and a hard rule about never parking the loaded vehicle in the sun.
Two timing exceptions worth knowing. Winter moves are actually easy in one sense, because the cluster is compact and nobody is flying, so foragers are not an issue at all. The catch is that a clustered colony is fragile to jostling and comb can break in the cold, so drive gently and pick a mild day. Moving during a heavy flow costs you honey, since a colony spends a day or two reorienting instead of foraging, and it also means the boxes are at their absolute heaviest. If it can wait until after the flow, let it.
Weather to avoid outright: rain that turns the drive into a slip hazard, wind strong enough to make a strapped stack unstable on a hand truck, and any forecast where the destination end of the trip will be above the mid 80s while the hive is still closed.
Strapping: making the stack one object
A hive is a pile of unattached boxes held together by propolis and gravity. Neither survives a truck bed. Before anything moves, the bottom board, brood boxes, supers, inner cover, and outer cover need to become a single unit, and that is what a hive strap does.
The workhorse is a long ratcheting strap run vertically around the whole stack, snugged down until the boxes cannot shift or rock. The Keenso 16.4-foot beehive strap ($13.66) is the cheap, correct version: long enough to wrap a tall stack, with a ratchet that holds tension rather than a cam buckle that creeps. Run it front to back over the top, not side to side, so it pins the covers down as well as the boxes together. If the stack is tall, run a second strap.
For hives that live strapped, or for moves you make often, permanent fasteners are the better answer. Gsycle beehive fasteners, 10 sets ($26.39) are the adjustable buckle hardware that mounts to the boxes and clips shut, which means a hive is one wrench-turn from transport-ready instead of a five-minute strapping exercise. They are also what keeps a lid on in a windstorm and, in bear country, what an electric fence backs up rather than replaces; see the apiary predators guide.
Do not skip the bottom board. The most common strapping failure is a strap that captures the boxes but not the floor, so the hive lifts off its own bottom board as you tilt it onto the hand truck and the entire colony is suddenly open in your arms.
Sealing the entrance without sealing the air
The entrance gets closed so bees stay inside during transit. Everything else stays open, because a colony in a sealed box in a warm vehicle is in genuine danger.
Good entrance closures: a strip of #8 hardware cloth stapled or wedged over the opening, a purpose-built moving screen, a foam entrance block designed for the job, or a rolled entrance reducer with screen. All of them keep bees in while letting air through.
Bad closures: duct tape over the entrance, a rag stuffed in the hole, or anything solid. Bees inside will chew, propolize, and panic against a solid block, and the airflow loss is exactly the problem you cannot afford.
Close up after dark once flight has ended for the night. If you must close during the day, do it at dawn before flight begins, and accept that anything already out is lost. Some keepers close the night before a morning move so the colony settles before the drive; that is fine in cool weather and risky in heat.
The screened bottom board question. A hive already running a screened bottom board is much better set up for transport, because the floor itself is a vent. If yours has a solid bottom and you move colonies regularly, a screened bottom is worth adding for the transport benefit alone, on top of its mite-monitoring role covered in mite monitoring tools. For a solid-bottom hive, replace the inner and outer cover with a screened migratory-style top for the drive, or prop the outer cover on a screened rim, so the stack vents upward.
Heat is what kills bees in transit
Beekeepers worry about the bumps. The bumps are rarely the problem. A closed colony generates heat continuously and has no way to fan air through a sealed box, so the interior temperature climbs, the wax softens, and in a bad case combs collapse and the colony smothers in its own honey. It can happen in well under an hour in a hot vehicle, and the colony is usually beyond saving by the time you notice.
The rules that prevent it. Never move bees in a closed passenger car with the hive in the trunk. Use an open truck bed, a trailer, or a van with real airflow. Never park in the sun with a closed hive aboard, not for gas, not for coffee, not for five minutes. Keep transit short and continuous. Ventilate from above and below, ideally with a screened bottom and a screened top. And if the day is genuinely hot, move at night and unload before dawn rather than trying to manage it.
What overheating looks like: a loud, rising roar from the hive rather than a hum, bees wet and bedraggled at the screen, and syrup-like honey seeping from the entrance or seams, which means comb has already failed. If you hear the roar, get moving into airflow immediately, and if you are stopped, open the entrance in a shaded spot and let them out rather than lose the colony.
The other transit risk is comb collapse from heat plus weight, which is why heavy honey supers are worth removing before a summer move if the trip is long. Fewer, lighter boxes travel better than a full stack in every respect.
Lifting and loading without hurting yourself
A ten-frame deep full of honey and bees runs 80 to 90 pounds, and a full medium about 50. A three-box hive is therefore a genuinely heavy, awkward, live object, and the injury rate among beekeepers reflects that. There is no prize for carrying it alone.
Options, in order of how much your back will thank you. Break it down. Strap and move box by box if the destination is close and the colony can tolerate being open briefly, restacking in order at the new site. Use a hive carrier. The Mann Lake heavy-duty hive carrier ($92.95) is a two-person lifting device that clamps a strapped hive and gives both people real handles at a sane height, which turns a dangerous shuffle into a controlled carry. Use a hand truck with a strap around the hive and the truck together, which works well on firm ground and badly on lawn. Recruit a second person regardless of method, because two people also means someone to open gates and steady the load.
In the vehicle, set hives entrance-forward if you can, so airflow during the drive vents rather than pressurizes the entrance, and strap the hives to the vehicle as well as to themselves. A hive that tips over in a truck bed at 45 mph is a bad night for everyone. Load so nothing can slide: against the cab, blocked with something solid, and ratcheted down.
The arrival routine
Have the site ready before you leave the old one. A level, firm stand, oriented the way you want the entrance to face, with the surroundings cleared. Setting a live hive down is not the time to be hunting for cinder blocks. Site selection, sun, drainage, wind, and neighbors, is covered in the beehive placement guide.
Set it down and let it settle. Place the hive on the stand, confirm it is level side to side and tipped very slightly forward so rain drains out the entrance, and give the colony a few minutes to calm before you do anything else.
Open the entrance and step away. Standing directly in front of a hive you just released is how you learn about defensive behavior. Open it from the side or behind, then leave. If it is still dark, opening now is fine; the colony will fly at first light and reorient then.
Reduce the entrance. A colony that just relocated is disoriented and temporarily weakened, and if the new yard has other hives, robbing pressure is real. Leave a reducer in for several days.
Give them water. A colony that just spent hours sealed in a box is thirsty, and a new yard may not have a known water source yet. A shallow water source with landing material nearby saves them a day of searching and keeps them out of your neighbor's pool; options are in bee water stations.
Do not inspect. Not that day, and preferably not for several days. The colony has enough to do. If comb broke in transit, you will see the signs from outside and can address it at the first real inspection, which should follow the normal inspection method.
The week after a move
Day 1. Watch the entrance from a distance. On the first warm morning you should see orientation flights: bees hovering in widening arcs facing the hive rather than flying straight out. That is the colony rebuilding its map and it is exactly what you want to see. Heavy fighting at the entrance instead means robbing, and the entrance needs closing down further.
Days 2 to 4. Expect reduced foraging traffic, because the field force is relearning the neighborhood. Feed 1:1 syrup if stores are thin or the move happened outside a flow; use an in-hive feeder to avoid attracting robbers, per how to feed bees sugar syrup.
Day 5 to 7. First inspection. What you are checking: did comb break or shift in transit, is the queen alive and laying, and is the colony orienting normally. Broken comb gets cut out and the frame replaced; badly cross-combed damage is worth fixing now rather than later.
Ongoing. If you did a short in-yard move with the branch trick, keep checking the old location for a cluster of stranded bees over the first few evenings and scoop them into a box to carry over after dark. They will not find their way on their own once they have settled into a cluster.
The colony that does not recover in a week usually has a queen problem, either she was lost or injured in the move or the colony was queenless before you touched it. Run the queenless check, and if the answer is bad late in the season, merging is often better than nursing it; that decision is in how to combine two hives.
Special cases: nucs, winter, and long hauls
Moving a nuc. Far easier than a full hive: light, small, and often already designed to close. A plastic nuc with a locking, vented lid is essentially a purpose-built transport box, which is why they dominate the split and swarm world discussed in how to split a hive. Same rules apply on distance and heat, just with less lifting.
Moving in winter. The forager problem disappears because nobody is flying, so a winter move can go straight to the new location regardless of distance. The tradeoffs are different: a clustered colony is vulnerable to being shaken loose from its stores, and cold comb is brittle. Move on a mild day, drive gently, and put the hive back together exactly as it was so the cluster is still positioned under its food. If you have wrapped for winter already, keep the wrap on. See how to winterize a beehive.
Long hauls and interstate moves. Anything over a couple of hours needs a plan for airflow, stops, and heat, and it is worth reducing the hive to its brood boxes so there is less weight and less comb to fail. Crossing state lines with live colonies can trigger inspection and permit requirements that vary considerably by state, and the honest advice is to check with the destination state's apiary program before loading, not after. The landscape is summarized in beekeeping laws by state. Practical operational guidance for colony handling is available through the extension bee health program and your local extension beekeeping resources.
Moving away from a nuisance complaint. If the reason for the move is a neighbor, do the whole job at night and consider the three-week round trip so no bees linger at the old address. Nothing undermines a neighbor conversation like a cluster of confused bees on their fence for three days after you promised the hive was gone.
Eight ways hive moves go wrong
1. Moving during the day. The field force is stranded. Move after dark or before first light, every time.
2. Sealing the hive airtight. Heat builds, comb softens, the colony smothers. Close the entrance with screen and leave everything else venting.
3. Strapping above the bottom board. The stack lifts off its own floor mid-carry and the hive opens in your hands. Always capture the bottom board.
4. Parking in the sun. A closed hive in a sunlit truck bed at a gas station is a real way to lose a colony in fifteen minutes.
5. Moving 50 feet across the yard with no technique. Squarely in the dead zone between three feet and three miles. Use the branch trick, the daily shuffle, or the three-week round trip.
6. Not preparing the destination. Standing on a lawn at midnight holding 150 pounds of live bees while looking for something level is a bad way to learn this lesson.
7. Carrying a full stack alone. Deeps run 80 to 90 pounds each. Break it down, use a carrier, or bring help.
8. Inspecting the next morning. The colony is already reorganizing. Give it five to seven days, then inspect properly.
How to Move a Beehive
- 1
Decide whether the distance needs technique
Under 3 feet, just move it. Over 3 miles, a standard transport move works cleanly because bees reorient at the new site. Between the two, plan for lost foragers and use the branch trick, a 3-feet-a-day shuffle, or a 3-week round trip beyond 3 miles and back.
- 2
Prepare the destination first
Build and level the new stand, set the entrance orientation, and clear the approach before you touch the hive. Confirm the stand is firm, level side to side, and tipped very slightly forward so rain drains out the entrance.
- 3
Choose a cool night or the hour before dawn
Move when every forager is home, which means after dark or before first light. Prefer cool weather, since a closed colony generates heat with no way to vent it, and postpone if the destination end of the trip will be hot.
- 4
Reduce the stack if it is tall or heavy
Pull honey supers for a summer move and consider moving the hive in two loads rather than one. A ten-frame deep runs 80 to 90 pounds full, and fewer, lighter boxes travel better and break less comb.
- 5
Strap the hive into a single unit
Run a ratcheting strap front to back over the outer cover and around the bottom board, snugged until nothing rocks. Capture the bottom board, not just the boxes, or the hive will lift off its own floor mid-carry. Add a second strap on a tall stack.
- 6
Screen the entrance, never the ventilation
Close the entrance with hardware cloth, a moving screen, or a screened entrance block after flight has ended for the night. Leave the screened bottom board open and add a screened top if the hive has a solid floor, because heat is the main transit killer.
- 7
Load with airflow and secure the load
Use an open truck bed, trailer, or well-ventilated van, never a sealed car trunk. Set hives entrance-forward where possible, block them against sliding, and strap them to the vehicle as well as to themselves.
- 8
Drive directly, and never park in the sun
Keep transit short and continuous, with no stops in direct sunlight. If you hear the hive roar rather than hum, get moving into airflow immediately or open the entrance in deep shade rather than lose the colony to heat.
- 9
Set the hive on the prepared stand
Place it level and slightly forward-tipped, then leave it a few minutes to settle before doing anything else. Do not remove the strap until the hive is exactly where it will live.
- 10
Open the entrance from the side and step away
Release the bees from beside or behind the hive rather than standing in the flight path, then walk away. If it is still dark, open it now, since the colony will fly and reorient at first light.
- 11
Reduce the entrance and offer water
Fit an entrance reducer for several days, because a relocated colony is temporarily weaker and vulnerable to robbing. Provide a shallow water source with landing material nearby, since a new yard may have no known water.
- 12
Wait five to seven days, then inspect
Watch entrance activity from a distance for orientation flights on the first warm morning, feed 1:1 syrup in an in-hive feeder if stores are thin, and leave the hive closed for at least five days. Then inspect for broken comb, a laying queen, and normal behavior.
More gear worth comparing
Beyond this guide: the highest-rated gear across every category and budget, with a live price check on each.




As an Amazon Associate we may earn from qualifying purchases, at no cost to you.
Quick shop: every pick
Skip the scroll: the whole lineup, with a live price check on each.
- Keenso Beehive Ratchet Strap, 16.4 ftBest Hive StrapKeenso · $13.66Check Price
- Gsycle Beehive Fasteners with Nuts, 10 SetsBest Permanent Hive FastenersGsycle · $26.39Check Price
- Mann Lake Heavy Duty Hive CarrierBest Lifting AidMann Lake · $92.95Check Price
- GJD Beehive Entrance Reducer and Mouse Guard, 4-PackBest Post-Move Entrance ControlGJD · $18.99Check Price
Key terms
- Orientation flight
- The widening arcs a young bee flies while facing the hive entrance, memorizing its position against surrounding landmarks. It is why foragers return to a location rather than to their colony, and why a moved hive strands its field force.
- Three feet or three miles
- The rule of thumb for hive relocation. Under three feet, returning foragers find the entrance anyway. Over three miles, the site is outside their normal foraging range so the whole colony reorients. In between, foragers fly back to the old spot and are lost.
- Branch trick
- Leaning a leafy branch or board across the entrance after a short move, so departing bees must crawl through an obstruction. The disruption prompts many to reorient rather than fly straight back to the old location.
- Moving screen
- A screened panel that closes a hive entrance or replaces a cover for transport, keeping bees in while air flows through. The correct alternative to taping or blocking an entrance solid.
- Screened bottom board
- A hive floor made of mesh rather than solid wood. It doubles as transport ventilation and as the platform for a sticky-board mite count, which makes it worth having on any hive that travels.
- Comb collapse
- Wax softening and failing under heat and the weight of stores, usually inside a sealed hive in a warm vehicle. The signature failure of a badly ventilated move, and typically fatal to the colony.
- Migratory cover
- A flat top cover sized flush to the box, used in place of a telescoping cover so hives can be packed tightly on a truck. Common in commercial operations that move colonies for pollination.
- Drift
- Bees ending up in a colony other than their own, usually the neighboring hive, after losing their own entrance. Following a move, drift is how the stranded field force gets absorbed by other hives in the yard.
Questions, answered
how far can you move a beehive
Less than 3 feet or more than 3 miles without special technique. Under 3 feet, returning foragers find the entrance anyway. Over 3 miles, you are outside their normal foraging range so the whole colony reorients on the first flight. Anything in between strands foragers at the old location unless you use the branch trick, a 3-feet-a-day shuffle, or a 3-week round trip beyond 3 miles and back.
what is the 3 feet or 3 miles rule for bees
It describes forager fidelity to a remembered location. Bees learn the hive's position during orientation flights and navigate back to that position, not to their family, so moving the hive to somewhere new within their foraging range means they return to empty air. Three feet is close enough for them to find the entrance; three miles is far enough that no memorized route overlaps. Treat those numbers as safe boundaries rather than exact physics.
what time of day should i move a beehive
After full dark or before first light, when every forager is home. A hive moved during the day leaves thousands of bees in the field with nowhere to return to. Cool weather is also better than hot, because a closed hive generates heat with no way to fan it out, and heat is the main transit risk.
how do you move a beehive a short distance in the same yard
Pick one of three methods. Move it at night and lean a leafy branch across the entrance so bees crawl out through an obstruction and reorient. Or slide the hive up to three feet each evening until it arrives, which is reliable but slow. Or haul it more than three miles away for two to three weeks and bring it back to the new spot, which is essentially foolproof and costs two trips.
do you need to close the entrance when moving bees
Yes, but only the entrance, and only with screen. Close it after flight has ended with hardware cloth, a moving screen, or a screened entrance block so bees stay in while air still flows. Never tape it shut or stuff it solid, because a sealed colony overheats fast in a vehicle and can lose its comb and its cluster within an hour.
can you move a beehive in a car
Not in a closed passenger car with the hive in the trunk. A colony needs continuous airflow in transit, and a sealed trunk on a warm day is where transported colonies die. Use an open truck bed, a trailer, or a van with real ventilation, keep the drive short and continuous, and never park in the sun with a closed hive aboard.
how do you strap a beehive for moving
Run a long ratcheting strap front to back over the outer cover and around underneath the bottom board, then tighten until nothing rocks. Capturing the bottom board is the step people skip, and skipping it means the boxes lift off their own floor mid-carry. Add a second strap on a tall stack, and strap the hive to the vehicle as well as to itself.
how long after moving a hive can i inspect it
Five to seven days. The colony spends the first few days reorienting and reorganizing, and opening it immediately adds stress it does not need. Watch the entrance from a distance instead: orientation flights on the first warm morning mean the move worked. Then inspect for broken comb, a laying queen, and normal brood.
will bees return to the old hive location
The foragers will, for a few days, and they will cluster at the old spot when they cannot find the entrance. If you moved within the same property, set an empty box at the old location, let them gather in it during the day, and carry it to the new site after dark. Bees that settle into a cluster will not find their way on their own.
can you move a beehive in winter
Yes, and in one way it is the easiest season, because nobody is flying so the forager problem disappears entirely and you can move any distance. The tradeoffs are different: a clustered colony can be shaken away from its stores and cold comb is brittle. Pick a mild day, drive gently, keep the boxes in their original order so the cluster stays under its food, and leave any winter wrap in place.
Filed under Explainer
Part of How-To Guides
Keep reading
The Beehive Placement Guide
Sun, drainage, wind, water, and neighbors: where the hive should end up once you can move it.
How to Split a Hive
Moving frames instead of colonies, and the same forager drift problem in miniature.
How to Combine Two Hives
The newspaper method, for when a move ends with a colony too weak to stand alone.
How to Feed Bees Sugar Syrup
What to put on a relocated colony while its field force relearns the neighborhood.
The Best Robbing Screens and Entrance Reducers
Keeping a disoriented, temporarily weak colony from becoming a robbing target.
Beekeeping Laws by State
Registration, inspection, and the rules that apply when colonies cross state lines.