Our Pick: GJD
Check PriceHow to Winterize a Beehive: The Full Survival Protocol
Here is the honest version of winterizing, answer first: a hive survives winter if it goes in with low mites, heavy stores, a dry ceiling, and a small defended entrance, in that order of importance. The gear side of that list is cheap. A stainless entrance reducer with a built-in mouse guard runs $18.99 for a 4-pack, a candy board that insures against March starvation is $37.99, and a fitted wrap like the MayBee winter wrap is $26.99 if your climate justifies one. The expensive part is the part you cannot buy in November: the varroa treatment you either did or did not do back in August.
By The BeehiveKits Hive Desk2026-08-2821 min read Fact-checked against verified Amazon listingsHow we research
That ordering surprises new beekeepers, because winterizing looks like a wrapping-and-insulating project, and the wrap is genuinely the least important item on the list. Cold does not kill a healthy, heavy, dry colony; honey bees winter successfully in places where February means 20 below. What kills colonies is a mite-damaged population of winter bees that dwindles in December, a light hive that starves in February, or condensation raining off a cold inner cover onto the cluster in January. Every hour of winter prep should attack those three killers before a dollar goes to insulation.
This guide runs the whole protocol in the order you should execute it, August through March, on a US temperate baseline with adjustments for the Gulf South, the northern tier, and everywhere between. It pairs with our gear roundups where hardware decisions get long treatment: wraps and stands in the stands and wraps guide, sugar and fondant in the winter feed guide, and the treatment chemistry in the varroa treatment guide. Standard disclosure, plainly: no brand paid for placement, and some links go to Amazon, where purchases may earn us a small commission at no extra cost to you. Prices verified at publication.
What to know
- Winterizing starts in August with a varroa knockdown, because winter bees reared by a high-mite colony arrive damaged and die by January.
- Weight target in cold-winter regions: roughly 40 to 60 pounds of capped stores, built with 2:1 syrup fed early while warm weather lets bees ripen it.
- Condensation kills more colonies than cold: insulate the top of the hive so warm moist air never meets a cold ceiling above the cluster.
- Reduce entrances and fit mouse guards before the first cold nights, not after; a mouse in a November hive is a winter-long disaster.
- A candy board is cheap insurance against late-winter starvation, the classic February-March failure of otherwise well-prepared hives.
- Wrap by climate, not by habit: zones 3 to 5 benefit, zones 6 to 7 are optional, zones 8+ should skip the wrap and mind ventilation instead.
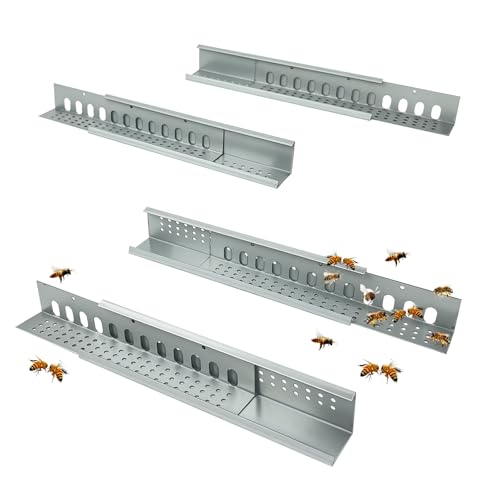
GJD Stainless Entrance Reducer & Mouse Guard, 4-Pack
GJD · Stainless steel (listed) · sliding adjustable openings · 4 per pack
Our verdict: The fall entrance problem solved in one piece of steel: an adjustable reducer for robbing season that closes to mouse-proof, bee-sized openings for winter. Mice gnaw wooden reducers and walk right in; they do not gnaw stainless. Four to a pack covers a standard apiary with spares.
Entrance hardware is the cheapest line on the winterizing list and among the most consequential, because one mouse in a November hive means shredded comb and a stressed cluster till spring. The GJD stainless reducer 4-pack ($18.99) does both fall jobs: slide it wider as an ordinary reducer during the September robbing crunch, then close it down to its small, rodent-proof setting before the first frosts.
Install by early October in temperate regions, September up north, and check after storms that snow and dead bees have not sealed the opening. The broader entrance field, including robbing screens for dearth season, is ranked in the robbing screens and entrance reducers guide.
Who should buy it
Every keeper of wooden hives in any region with mice, which is every region; the 4-pack prices out cheaper than replacing one frame of mouse-ruined comb.
What we don't like
Metal guards can shear pollen loads off returning foragers if fitted too early in fall, and the smallest setting needs a monthly glance to be sure dead bees are not clogging it.
- Material
- Stainless steel (listed)
- Function
- Entrance reducer + mouse guard, sliding
- Quantity
- 4 per pack
- Fit
- Standard Langstroth entrances (listed)
- Price
- $18.99
Pros
- Mouse-proof where wooden reducers fail
- Adjustable through fall robbing season
- Four-pack covers the whole yard
- Reusable for many seasons
Cons
- Needs periodic clearing of winter dead bees
- Fit may need minor bending on off-spec entrances

BeeCastle 10-Frame Beehive Candy Board
BeeCastle · Fits 10-frame Langstroth (listed) · holds packed sugar or fondant slab · installs above top box
Our verdict: The tidy version of late-winter insurance: a rim frame that holds a slab of hardened sugar right where the rising cluster will find it. Installed at the last fall inspection, it converts the classic February starvation dead-out into a non-event, and whatever the bees do not eat dissolves into spring syrup.
The cruelest winter loss is the March colony dead an inch from honey it could not reach, and the fix is feed the cluster cannot miss: directly overhead, where its own heat rises. The BeeCastle 10-frame candy board ($37.99) is a purpose-built frame for exactly that, sized for standard stacks; pack it with a simple sugar slab, set it on at the final October inspection, and stop worrying about February.
Bees ignore it while stores hold, which is the point: it is insurance, not a feeding plan. The recipe options, and the cheaper fondant and mountain-camp alternatives it competes with, are covered in the winter bee feed guide.
Who should buy it
Cold-winter keepers, first-year keepers whose fall feeding started late, and anyone who has ever lost a March colony to starvation and does not care to repeat the experience.
What we don't like
You supply and pack the sugar yourself, it adds a rim of height under the covers, and 8-frame keepers need to verify fit before ordering.
- Fit
- 10-frame Langstroth (listed)
- Function
- Holds emergency sugar/fondant above cluster
- Install
- Above top box, under covers
- Season
- October through first spring inspection
- Price
- $37.99
Pros
- Feed positioned where a winter cluster can actually reach it
- Installed once in fall, no cold-weather hive openings
- Unused sugar recycles into spring syrup
Cons
- Sugar slab is DIY
- One more component to store all summer

MayBee Winter Bee Hive Wrap
MayBee · Fits 10 and 8 frame hives (listed) · 600D shell (listed) · reusable seasons over seasons
Our verdict: The right wrap for the ordinary cold-temperate winter: fitted, fast, and honest about its job, which is cutting wind infiltration and adding a little solar gain, not heating the hive. In zones 5 and 6 it is cheap margin on a hive that already has mites, weight, and moisture handled.
A wrap is the fourth most important item on the winter list, and once the first three are done it is genuinely worth having in cold regions. The MayBee winter wrap ($26.99) is the fitted, no-drama version: on after feeding ends, dark surface catching low winter sun, off again when the willows bloom, and folded into the shed for next year.
It cannot fix a light hive or a wet ceiling, and in zones 8 and up it is a liability, per the zone table above. Where it sits among cozies, foam jackets, and doing nothing is laid out in the stands and winter wraps guide.
Who should buy it
Keepers in roughly zones 5 to 6 running wooden hives, especially exposed yards and first-winter colonies without deep stores histories.
What we don't like
It solves the third-tier winter problem, so buying it instead of top insulation or a mouse guard is backwards; fit it so entrance and upper vent stay fully clear.
- Fit
- 10 and 8 frame hives (listed)
- Material
- 600D shell (listed)
- Insulation
- Wind-cutting layer, minimal R-value
- Reusable
- Yes
- Price
- $26.99
Pros
- Installs and removes in minutes
- Cuts wind through thin pine and box joints
- Dark shell adds midwinter solar gain
Cons
- Not meaningful insulation on its own
- Unnecessary to counterproductive in mild climates

Hlimior Insulated Winter Beehive Wrap
Hlimior · Fits 8 and 10 frame beehives (listed) · insulated foam layer (listed) · fitted wrap design
Our verdict: The three-dollar upgrade that matters in genuinely cold country: where the MayBee cuts wind, the Hlimior adds an actual insulation layer to the walls, closing the gap between a bare pine box and the insulated-hive ideal. In zones 3 to 5 with a warm ceiling above the cluster, this is the wall treatment we would run.
North of roughly zone 5, wind-cutting alone leaves calories on the table, and wall insulation starts paying real dividends. The Hlimior insulated wrap ($29.99) adds a foam layer inside a fitted shell for 8- and 10-frame stacks, splitting the difference between a fabric wrap and committing to insulated equipment like the Apimaye line we cover in the insulated hive guide.
Physics note worth repeating: insulated walls raise the payoff of an insulated ceiling, because the coldest remaining surface is where condensation forms. Wrap the walls, and make doubly sure the top is the warmest surface in the hive.
Who should buy it
Zone 3 to 5 keepers and high-elevation yards wintering in standard wooden equipment, run together with top insulation and an upper entrance.
What we don't like
In milder zones it is more wrap than the winter warrants, and any insulated wrap fitted sloppily over the entrance or vent does more harm than a bare hive.
- Fit
- 8 and 10 frame beehives (listed)
- Material
- Insulated foam layer (listed)
- Function
- Wall insulation + wind block
- Reusable
- Yes
- Price
- $29.99
Pros
- Real insulation, not just a windbreak
- Fitted design, quick install
- Cheap versus converting to insulated equipment
Cons
- Overkill south of zone 6
- Demands careful fit around entrance and upper vent
What actually kills winter colonies (it is not cold)
Start with the autopsy data, because it sets every priority below. When beekeepers open dead hives in March, the same three scenes repeat. Scene one: a shrunken cluster, a few hundred bees, dead in November or December with honey everywhere, often with deformed-wing bees on the bottom board. That is varroa, or more precisely the viruses varroa vectored into the winter bees back in September. Scene two: a fist-sized cluster dead head-down in empty cells, sometimes inches from capped honey it could not reach in the cold. That is starvation, and late winter is its season. Scene three: moldy, wet bees under a soaked inner cover. That is condensation, the cluster's own breath rained back down on it as ice water.
Cold, by itself, is almost never the killer. A healthy cluster is a remarkable furnace: bees shiver their flight muscles to hold the core above 90F whenever brood is present, and the colony as a whole tolerates weeks of subzero air as long as it is dry, provisioned, and populous. The University of Minnesota extension, which winters research colonies through genuinely brutal weather, builds its whole protocol around this point: manage mites, weight, and moisture, and the cold takes care of itself. National loss surveys tracked by the Bee Informed Partnership have run around 40 to 50 percent annual losses in recent years, and the majority of those winter dead-outs trace to the first scene, mites, which is why this winterizing guide starts in August rather than October.
August: the mite knockdown that makes real winter bees
The single most important winterizing task happens two months before anything that looks like winter prep. Around late August and September, the colony starts rearing winter bees, a physiologically distinct generation with fat reserves that live for months instead of weeks and carry the colony to spring. Those bees are made exactly once. If they are reared in a high-mite colony, varroa feed on the developing pupae and load them with viruses, and the damage cannot be undone by any treatment later: you can kill the mites in October, but the winter bees are already compromised, and the colony dwindles and dies with a clean bill of mite health and honey in the comb.
So the protocol is: count in early August, treat at threshold, recount to confirm. The threshold consensus from extension programs and the Honey Bee Health Coalition runs around 2 to 3 mites per 100 bees by alcohol wash, and in the run-up to winter-bee rearing most experienced keepers treat at the low end or on principle. Which chemistry to use depends on your temperatures and whether supers are on; that full decision tree lives in our treatment timing guide and the product-by-product comparison in the varroa treatment roundup. The winterizing takeaway is simpler: if you are reading this in August or early September and have not counted mites, stop reading and go do that first. Every other item on this page is decoration on a colony that skips this one.
September: the weight targets, and how to hit them
A winter colony eats its way through stores from the inside of the cluster, and the arithmetic is unforgiving: in cold-winter regions the standard target is roughly 40 to 60 pounds of capped stores, with northern-tier keepers aiming at the top of that range and beyond, mid-Atlantic and southern keepers getting away with less. The Penn State extension's fall management guidance puts typical northeastern consumption at 50-plus pounds, and running out is not a graceful failure: a cluster that exhausts stores dies in days, not weeks.
Two ways to measure. The precise way is a luggage scale under the back edge, doubled, minus your known equipment weight. The traditional way is the heft test: lift the back of the hive with two fingers. If it comes up easily, the hive is light; if you genuinely strain, you are close. Calibrate your hand now, in September, against a hive you have weighed, and heft every hive every visit for the rest of the year.
To close a gap, feed 2:1 sugar syrup by weight, early and fast. Bees need weeks of warm-enough days to take syrup down, invert it, dry it, and cap it, and cold nights end the taking abruptly, usually sometime in October in the baseline region. A hive that is 20 pounds light on September 1 is an easy fix; the same hive on October 20 is a candy-board-and-hope situation. Feeder hardware and syrup recipes are compared in the feeder guide, and the fondant-and-sugar side of the ledger in the winter feed guide. One warning that belongs here: fall feeding in a dearth invites robbing, so feed inside the hive, at dusk, with entrances already reduced, never from open dishes.
Reduce the entrance and fit the mouse guard before the first frost
Fall entrance hardware does three jobs. It shrinks the doorway a dwindling guard force must defend during peak robbing season; it cuts the wind that would otherwise blow straight into the cluster's ground floor; and, fitted with a proper metal guard, it keeps mice out. That last one is on a deadline. When night temperatures drop into the 40s, mice go house-hunting, and a beehive is the best real estate in the neighborhood: warm, dry, roofed, and stocked with food. A mouse that gets in before the guard goes on will shred comb, urinate through the stores, and stress the cluster all winter, and the bees, too cold to break cluster and sting, can do nothing about it.
Wooden entrance reducers work but mice gnaw them wider. The better fall tool is stainless or galvanized steel, and the GJD stainless entrance reducer and mouse guard 4-pack ($18.99) is the pattern we like: a sliding steel strip that works as an adjustable reducer all fall and closes down to bee-sized, mouse-proof openings for winter, four to a pack so both hives and your spare boxes are covered. Fit it by early October in the baseline region, September up north. Two details matter: set the opening small but not tiny, since bees must drag their winter dead through it, and check after every hard snow that drifts have not sealed it entirely. The full field of entrance hardware, including robbing screens for the fall dearth, is in the robbing screen and entrance reducer guide.
Condensation: the killer most beginners never see coming
A wintering cluster exhales a surprising amount of water vapor; metabolizing honey produces it, roughly matching the weight of the honey consumed. That warm moist air rises off the cluster, and what happens next decides more winters than any wrap. If the air hits a cold ceiling, an uninsulated inner cover at outdoor temperature, the moisture condenses, and gravity delivers it back onto the cluster as a cold drip. Wet bees cannot maintain cluster temperature. Dry cold is survivable; wet cold is lethal, and the cruel part is that condensation is worst in exactly the well-sealed, heavily-wrapped hives whose owners tried hardest.
The fix is to make the ceiling warm, and it is the strongest argument in all of winterizing: insulate the top of the hive first, before the sides, before anything. When the surface above the cluster is warmer than the dew point of the rising air, moisture does not condense there; it migrates to the cold outer walls, where it runs down harmlessly away from the bees. Three ways to build a warm ceiling, any of which works: a sheet of 1.5-to-2-inch rigid foam board on top of the inner cover under the outer cover; a purpose-made insulated cover; or the traditional quilt box, a shallow rim filled with wood shavings above a breathable cloth, which both insulates and absorbs moisture, and which northern keepers swear by. Pair the warm ceiling with a small upper entrance or notched inner cover to let some moist air escape and give bees a top door if snow buries the bottom one, and tilt the whole hive about a degree forward so any water that does form runs out the front. This is also the core argument for insulated hives generally, which we take up in the insulated hive guide: hives like the Apimaye build the warm ceiling and walls in from the factory.
The candy board: cheap insurance against the February heartbreak
Even a hive that hit its weight targets can starve in late winter, and the mechanism is worth understanding because it drives the fix. In midwinter the cluster moves as a unit, slowly, upward and along the comb, eating as it goes, and in deep cold it cannot detour sideways to honey two frames away; frames the cluster is not touching may as well be in another hive. Come late February the queen resumes laying, the cluster anchors itself to the brood and will not abandon it, consumption triples, and a colony that wintered beautifully starves in March inches from food. This is the classic late-winter dead-out, and it has ruined more first springs than any other failure.
The insurance policy is emergency feed directly above the cluster, where rising heat keeps it reachable no matter what the weather does, installed at the final fall inspection so you never have to open the hive in the cold to add it. A candy board is the tidy version: a rim frame holding a slab of hardened sugar, laid on the top box under the covers. The BeeCastle 10-frame candy board ($37.99) is a ready-made frame sized for standard Langstroth stacks; you cook or pack the sugar slab yourself (a no-cook recipe of sugar and a little water pressed into the frame works fine) and set it on in October. Bees ignore it while stores hold and eat straight into it when the cluster arrives at the top, and in spring you lift off whatever remains. The alternatives, fondant patties like Hive Alive or plain dry sugar on newspaper (the mountain camp method), do the same job with less hardware, and we compare all of them in the winter bee feed guide. What does not work is liquid syrup: below roughly 50F bees cannot take it, and a cold syrup feeder is dead weight and a humidity source. One rule either way: emergency feed goes on top of the frames, never at the entrance.
Wind breaks, siting, and the cheap calories of shelter
Wind is a calorie tax. A cluster in still air holds its heat in a boundary layer around the hive walls; a 20 mile-per-hour wind strips that layer continuously, and the bees pay the difference in honey. The classic study of wintering yards, and the consistent advice from northern extension programs, is that a windbreak on the prevailing winter side, usually north and west in most of the US, is worth more than it costs in every cold region. Evergreens are the gold standard. Failing that: a fence line, a building wall, stacked straw bales, a pallet screwed upright, or snow fencing. Even relocating hives a few feet into the lee of a shed in October is a legitimate winterizing move, provided you follow the move-it-two-feet-or-two-miles rule.
Two more siting notes for winter. First, winter sun is an asset: a southeast-facing entrance catches morning light, and midwinter sunshine on the front of a dark-wrapped hive triggers the cleansing flights that keep the cluster healthy. Do not winter hives in the deep shade you might have valued in July. Second, think about snow logistics now: hives on a stand 16 to 18 inches up stay above drift line and damp ground, and a stand also keeps skunks from scratching at the entrance on warm nights. Options are in the stands and wraps guide. Strap or weight every lid; the same wind you are breaking will happily frisbee an outer cover into the next county in a January storm.
To wrap or not: an honest answer by climate zone
Now, finally, the item most people start with. A wrap does two real things: it cuts wind infiltration through box joints, and dark material adds a little solar gain on sunny days. What it does not do is heat the hive, and a wrap on a light, mite-sick, or wet hive changes nothing. With the priorities above handled, here is our honest wrap call by USDA zone:
| Climate | USDA zones | Our call | Notes |
|---|---|---|---|
| Northern tier, upper Midwest, high elevation | 3 to 4 | Wrap, insulated | Insulated wrap or cozy plus top insulation; consider quilt box. Wind break near-mandatory. |
| Cold temperate (baseline region) | 5 to 6 | Wrap recommended | A fitted wrap earns its keep most winters; top insulation still outranks it. |
| Mid-South, mid-Atlantic coastal | 7 | Optional | Marginal benefit; skip it or wrap only exposed yards. Spend the money on feed. |
| Gulf South, low desert, coastal California | 8 to 10 | Do not wrap | Overheating and moisture risks exceed benefits. Mind ventilation, mites, and winter stores instead. |
For the recommended zones, two patterns work. The simple wind-cutting layer is the MayBee winter wrap ($26.99), a fitted 600D shell that goes on in minutes after feeding ends and comes off in March, sized for 8- and 10-frame stacks. The step up for zones 3 to 5 is an insulated wrap like the Hlimior insulated beehive wrap ($29.99), which adds a foam layer for real R-value on the walls. Either way the wrap must not seal the entrance or the upper vent, and it goes on after the mouse guard, never instead of it. Timing: wrap around Thanksgiving in the baseline region, early November up north, and unwrap when willows bloom.
The do-not-open rules (winter restraint, codified)
From the last October inspection to the first sustained mild spell of spring, the hive stays closed, and this is a rule worth codifying because breaking it always feels justified in the moment. Every crack of the lid in cold weather breaks the propolis seal the bees spent September building, dumps the warm air blanket above the cluster, and can chill the small patches of brood the colony starts in late winter. The information you would gain is almost never actionable in January anyway. So: no frame inspections below about 60F, no lid-cracking below about 40F, and even the quick peeks reserved for genuine decisions like emergency feeding.
What you can do all winter, from outside, tells you nearly everything: heft the back edge monthly for weight; put an ear to the box and knock gently, a healthy cluster answers with a brief rising hum; watch the entrance on any day above 50F for cleansing flights, the surest sign of life there is; and read the snow, where a scatter of dead bees in front of the entrance is housecleaning and therefore good news. A few dozen bodies on the landing board in February means undertaker bees are working, which means a live cluster is producing them. The one sanctioned exception to the closed-lid rule: on a mild, windless late-winter day, a seconds-long lift of the outer cover to glance under the inner cover hole, checking whether the cluster has arrived at the top of the stack. Bees boiling at the inner cover in February is your cue that the next section is now urgent.
Late winter: the starvation checks that save March colonies
February and March are when winterizing pays out or fails, and they are the one stretch where restraint bends toward action. Brood rearing has resumed, consumption is at its winter maximum, and stores are at their minimum: this is starvation season, and colonies that die now were often savable with two minutes of work. The monthly heft becomes a biweekly heft. A hive that suddenly hefts light, or shows bees at the inner cover hole when you make the seconds-long check, needs emergency feed that day, on the next hour above freezing if possible.
The late-winter feeding menu, best to worst: fondant or a candy board refill laid directly over the cluster (if you installed a candy board in October, this is already done, which is the entire point of the BeeCastle candy board); dry granulated sugar poured on a sheet of newspaper across the top bars, crude and effective; or a commercial winter patty. Not on the menu: syrup, until day temperatures reliably clear 50F. Work fast, no smoke needed, lid off and on in under a minute. And a warning for the other direction: the first warm week of March is not the finish line. Colonies routinely starve in early spring during cold snaps after brood nests have expanded, so keep feed on until the first real nectar flow has bees ignoring it. The transition into spring feeding and the first full inspection belongs to the first-year calendar, which picks up exactly where this guide ends.
The winterizing timeline on one table
Everything above, compressed to a checklist you can tape inside the shed door. Dates are for the US temperate baseline, roughly zones 5 to 7; slide four weeks earlier for the northern tier, four to six weeks later and lighter for the Gulf South.
| When | Job | Details |
|---|---|---|
| Early August | Mite count | Alcohol wash, half cup of nurse bees; treat at 2 to 3 per 100. |
| Mid August | Varroa treatment | Chemistry per temperature; see the treatment timing guide. Recount after. |
| Labor Day | Start 2:1 feeding | Feed inside the hive at dusk until hives heft heavy. Combine hopeless colonies. |
| Mid September | Entrance hardware | Reducer to small setting, metal mouse guard on, robbing screens if pressure is high. |
| Early October | Moisture plan | Top insulation or quilt box on, upper vent open, hive tilted forward. |
| Mid October | Final inspection | Confirm queenright and stores; candy board on; straps on; feeding ends when cold does it for you. |
| November | Wrap (zones 3 to 6) | Fitted or insulated wrap, entrance and vent clear. Wind break in place. |
| Dec to Jan | Monthly checks | Heft, clear entrance, check straps. Do not open. |
| Feb to Mar | Starvation watch | Biweekly hefts; emergency sugar or fondant over the cluster the day a hive goes light. |
| First bloom | Unwrap and inspect | Wrap off, mouse guard off at willow bloom, first full inspection at 60F. |
Regional adjustments: the South, the North, and the West
Gulf South and warm Southeast (zones 8 to 9): your winter is a management season, not a survival event, and most of this guide's hardware list shrinks. Skip the wrap, keep ventilation generous, and keep the mouse guard and reduced entrance, because robbing pressure and mice do not care about your mild January. Your real winter jobs are stores (colonies fly and eat all winter, and a warm December can burn stores faster than a cold one) and varroa, because brood is present year-round, so mites never get the broodless setback northern colonies give them; monitor straight through winter, per the year-round framework in the treatment calendar.
Northern tier and high elevation (zones 3 to 4): everything in this guide, executed early and doubled. Feeding done by late September, top insulation non-negotiable, insulated wrap or cozy standard, quilt boxes common, windbreaks near-mandatory, and upper entrances essential because bottom entrances spend weeks under snow. Many northern keepers also winter in a single deep plus a candy board or push colonies into insulated equipment entirely; the case for that gear is in the insulated hive guide.
Arid West and mountain West: huge day-night swings make top insulation even more valuable (it buffers both directions), wind is often the dominant stressor, so break it aggressively, and winter water matters, since flying bees on mild dry days need a source that is not a frozen neighborhood pool. Coastal Pacific keepers, meanwhile, fight moisture above all: in a 45F-and-raining winter, the quilt box is the whole ballgame.
The spring reversal: when and how to un-winterize
Winterizing has a closing procedure, and rushing it undoes the work. The wrap comes off when sustained daytime temperatures reach the 50s and willows or maples are blooming, in the baseline region usually mid-to-late March; leaving it on into warm spells risks overheating and bearding, but a warm week in February is a trap, not spring. The mouse guard converts back to a plain reduced entrance around the same time, and the entrance opens fully only when the colony is strong enough to defend it, usually May. Top insulation can stay well into spring, and there is a growing school that leaves it on year-round; it costs nothing and buffers spring cold snaps that chill expanding brood nests.
The candy board comes off at the first full inspection, that first calm 60F day, and whatever sugar remains is a bonus you can dissolve into spring syrup. That inspection is also the winter report card: queenright or not, stores or empty, and the population verdict on your August mite work. Score it honestly, note what you would do differently in a hive journal you will actually reread in August, and then go read the month-by-month calendar, because the colonies that sail through next winter are the ones whose keeper started this protocol on time. Winterizing is not an October project. It is a fall discipline with an October costume.
How to Winterize a Beehive
- 1
Knock down varroa in August
Alcohol-wash a half cup of nurse bees and treat at or above 2 to 3 mites per 100 bees, before the colony rears its winter bees. Recount after treatment to confirm it worked.
- 2
Assess stores and start fall feeding
Heft the back of the hive or weigh it: target roughly 40 to 60 pounds of capped stores in cold-winter regions. Feed 2:1 sugar syrup from early September until the hive is heavy or nights turn cold.
- 3
Reduce the entrance and fit a mouse guard
Install an entrance reducer at its small setting and a metal mouse guard before the first frosts, while mice are house-hunting. Check that bees can still clear dead bees through the opening.
- 4
Solve condensation with top insulation
Put insulation above the inner cover, a quilt box, foam board, or an insulated cover, so the ceiling above the cluster stays warm and moisture never condenses and drips on the bees.
- 5
Add a candy board or fondant as insurance
Place a candy board or fondant above the top box so a cluster that eats through its stores in late winter hits emergency feed instead of an empty ceiling.
- 6
Tilt, strap, and block the wind
Tilt the hive about one degree forward so water runs out the entrance, strap or weight the lid, and give the hive a windbreak on the prevailing winter side.
- 7
Wrap if your climate justifies it
In roughly USDA zones 3 to 5, add a fitted hive wrap or insulated cozy after feeding ends. In mild-winter regions skip the wrap; ventilation and stores matter more.
- 8
Then leave them alone and heft monthly
Do not open the hive in winter. Once a month, heft the back edge, clear the entrance of snow and dead bees, and add emergency sugar over the cluster on a mild day only if the hive feels light.
More gear worth comparing
Beyond this guide: the highest-rated gear across every category and budget, with a live price check on each.



As an Amazon Associate we may earn from qualifying purchases, at no cost to you.
Quick shop: every pick
Skip the scroll: the whole lineup, with a live price check on each.
- GJD Stainless Entrance Reducer & Mouse Guard, 4-PackEntrances and Mouse DefenseGJD · $18.99Check Price
- BeeCastle 10-Frame Beehive Candy BoardLate-Winter Starvation InsuranceBeeCastle · $37.99Check Price
- MayBee Winter Bee Hive WrapWind-Cutting Wrap, Zones 5 to 6MayBee · $26.99Check Price
- Hlimior Insulated Winter Beehive WrapInsulated Wrap, Zones 3 to 5Hlimior · $29.99Check Price
Key terms
- Winter bees
- The fat-bodied, long-lived generation reared from late summer that survives months instead of weeks and carries the colony to spring. They are made once, in September, which is why the August varroa knockdown is the first and most important winterizing task.
- Heft test
- Judging stores by lifting the back edge of the hive with two fingers. Calibrated in September against a known-heavy hive, then repeated monthly all winter; a hive that comes up easily is light and needs emergency feed.
- Quilt box
- A shallow rim filled with wood shavings over a breathable cloth, placed at the top of the stack. It insulates the ceiling and absorbs rising moisture, attacking condensation from both directions. A northern-winter staple.
- Candy board
- A rim frame holding a slab of hardened sugar, installed above the top box in fall. Emergency feed positioned directly in the rising cluster's path, insuring against the classic late-winter starvation dead-out.
- Mouse guard
- A metal entrance barrier that admits bees but not rodents, fitted before the first cold nights. Mice gnaw wooden reducers; they do not gnaw steel, which is why fall entrance hardware should be metal.
- Condensation kill
- The winter death pattern where the cluster's own exhaled moisture condenses on a cold ceiling and drips back as ice water. Prevented by making the surface above the cluster the warmest in the hive: top insulation before any wrap.
- Upper entrance
- A small opening near the top of the stack, often a notched inner cover, that vents moist air and gives bees a door when snow buries the bottom entrance. Standard practice in snow country.
- Cleansing flight
- A brief warm-day winter flight in which bees void accumulated waste. Yellow specks on the snow outside a January hive are one of winter's best signs: the colony is alive and housekeeping.
Questions, answered
When should I winterize my beehive?
Start in August with a varroa count and treatment, feed 2:1 syrup from early September until hives are heavy, fit entrance reducers and mouse guards by early October, and finish insulation, candy boards, and any wrap by late October or November depending on region. Winterizing done entirely in October is winterizing done half right, because the mite work and most of the feeding window land earlier.
How much honey does a hive need for winter?
Roughly 40 to 60 pounds of capped stores in cold-winter regions, with northern-tier colonies at the top of that range or above, and southern colonies needing less but still more than beginners expect, since warm-winter bees fly and eat all season. Judge it by hefting the back of the hive or weighing it, and close any gap with 2:1 syrup fed early in fall.
Should I wrap my beehive for winter?
It depends on climate: in roughly USDA zones 3 to 5 an insulated wrap is worth it, in zones 5 to 6 a wind-cutting wrap is cheap margin, in zone 7 it is optional, and in zones 8 and warmer skip it. A wrap only helps a hive that already has low mites, heavy stores, and top insulation; it is the fourth item on the list, not the first.
How do I keep condensation out of my beehive in winter?
Insulate the top of the hive so the ceiling above the cluster stays warm: foam board over the inner cover, an insulated cover, or a quilt box of wood shavings. Add a small upper vent or notched inner cover and tilt the hive slightly forward. Warm ceilings do not condense moisture; cold ones drip it back onto the cluster, which is the classic hidden winter killer.
Do I need a mouse guard on my beehive?
In any region with mice, yes, fitted before the first cold nights of fall, because mice move into hives when nights hit the 40s and a clustered colony cannot evict them. Use metal, not wood, since mice gnaw wooden reducers wider. Set the opening small but passable, and check monthly that dead bees and snow are not blocking it.
Can I open my beehive in the winter?
No frame inspections below about 60F and no lid-cracking below about 40F, with one exception: a seconds-long lift of the outer cover on a mild, calm day to check whether the cluster has reached the top of the stack, or to add emergency sugar or fondant to a light hive. Everything else you need to know comes from hefting, listening, and watching the entrance.
How do I stop my bees from starving in late winter?
Heft every two weeks from February, and the day a hive goes light, put feed directly above the cluster: a candy board installed back in October, fondant, or dry sugar on newspaper across the top bars. Never syrup in the cold; bees cannot take it below about 50F. Late winter is peak starvation season because brood rearing has resumed and consumption triples just as stores bottom out.
When do you treat for mites before winter?
August in most of the US, before the colony rears its winter bees, treating at roughly 2 to 3 mites per 100 bees by alcohol wash and recounting afterward to confirm the knockdown. An October treatment kills mites but cannot repair winter bees that were already parasitized as pupae, which is why late treatment so often produces a hive that dies in December anyway.
When should I unwrap my hive in spring?
When sustained daytime temperatures reach the 50s and early trees like willow and maple are blooming, typically mid-to-late March in temperate regions. Ignore one-week February warm spells. Mouse guards come off around the same time, entrances stay reduced until the colony can defend a full opening, and top insulation can stay on well into spring or year-round.
Filed under Explainer
Part of Hive Health · How-To Guides
Keep reading
When to Treat for Varroa
The August knockdown in full: thresholds by month, temperature windows by product, and the year-round treatment calendar.
The Best Winter Bee Feed
Fondant, candy boards, winter patties, and dry sugar compared for the stores gap and the February emergency.
The Best Hive Stands & Winter Wraps
The hardware behind the buttoning-up: stands, wraps, and cozies with honest notes on who needs which.
The Best Robbing Screens & Entrance Reducers
Fall's front-door hardware ranked: reducers, mouse guards, and the screens that stop a dearth-season robbing frenzy.
The Best Premium Insulated Beehives
The hives that winterize themselves: what Apimaye-style insulated equipment buys you and who should pay for it.
Your First-Year Beekeeping Calendar
Where winterizing fits in the whole year, month by month, from August mite work to the March report card.